Should you pop a blister? How can you speed up healing?
When and how should you pop a blister? And how can you speed up the healing? The only reason to pop a blister is to prevent it spreading, otherwise leave it alone. Naturally, it's better to prevent the blister in the first place.
Contents
1 Don't Pop the Blister
The only reason to pop a blister is when pressure will cause the blister to spread. That's the only reason; if the blister is not going to spread due to pressure, leave it alone. A wound heals twice as fast in a moist environment than when dried out. Popping a blister is a bad idea as a blister will heal faster and better when left intact. The idea of 'drying out' a wound is dated and wrong. Drying out a wound or bursting a blister can also increase the scar tissue that is left behind. The fluid inside a blister creates a good healing environment, far better than any dressing. The biggest problem with popping a blister is it introduces the possibility of infection. To make matters worse, a popped blister may refill with fluid, which is the worst of both worlds. Typically popping a blister will also make things more painful, so don't pop to reduce your discomfort. The fluid acts as a cushion to protect the raw flesh under the blister, so once the blister is popped, the two surfaces will then rub.
1.1 Moleskin Doughnut
The alternative to popping a blister due to pressure is to build up the area around the blister so that the pressure is relieved. Moleskin can be cut out in the shape of the blister, forming a doughnut shape that reduces pressure on the blister if it is small enough.
1.2 Taping Blisters
Putting tape over a blister on your foot can help reduce the pain. Care must be taken to ensure the tape does not peel up, causing further blistering. See Taping for more details.

2 How to Pop a Blister
If you have to pop a blister, your biggest risk is from infection. Bursting the blister will impair healing, but an infection will obviously make things far worse. Follow these steps...
- Clean your hands to make sure they are sterile.
- Sterilize the area first by wiping with an antiseptic wipe. Make sure you wipe the whole blister and the surrounding area.
- Ideally you should have a sterile tool to burst the blister. If you are using scissors, or anything else that is not in a sterile package, you must sterilize it. I use hypodermic needles for bursting blisters as they are very sharp and quite long. (One caution: hypodermic needles can be considered 'drug paraphernalia' if you don't have a good medial reason for having them.)
- Puncture the blister at the edge, ideally at the edge that will be lowest most of the time so that gravity aids drainage. Multiple punctures may be needed to provide sufficient drainage.
- Use a sterile dressing to push out the fluid, taking time to ensure you remove as much as possible. You can use an antiseptic wipe for this, but getting any of the antiseptic into the blister can be quite painful.
- Cover the blister with a dressing.
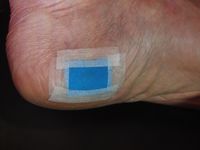
- Ideally, use a 'hydrocolloid' dressing, such as 'Band-aid Advanced Healing Blister Cushions'. A hydrocolloid dressing is one that is water and air tight, with a gel that absorbs fluids. This can keep the wound moist without becoming saturated (macerated).
- You may need an adhesive promoter such as tincture of benzoin to help keep things in place. Be careful with tincture of benzoin: If you put it near the punctures in the blister it can seep inside and be remarkably painful.
- Putting an adhesive promoter on the blister itself will mean that the blister and the dressing are bonded. When you then try to remove the dressing, it will take the skin of the blister with it. If possible apply tincture of benzoin only to the surrounding skin.
- If possible, leave the blister alone. Do not change the dressing unless it starts to come off or leaks. You can leave the blister covered for up to a week.
3 Other Techniques
There are two techniques I will mention, but would not recommend them nor have I ever tried them. One is to thread a strand of cotton through a blister so that it continues to drain. I feel that this increases the risk of infection significantly. The other technique is to inject tincture of benzoin into the blister after it is emptied, which glues the detached skin to the underlying flesh. I hear that this is amazingly painful and I am not sure of the risks in doing this.
4 Speeding up healing
There are two ways I've found of significantly speeding up the healing process. I've used these techniques to reduce the healing time by a few days.
4.1 Apply Heat
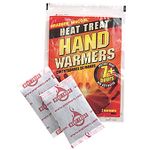
Keeping the blister warm improves blood flow and healing. You can use a heating blanket like a Theratherm, but this requires power and is inconvenient. Instead, using chemical hand warmers will keep the blister area warm for hours. I like to use the larger sized 'hot hands' warmers which keep warm for over 12 hours so I can replace them twice a day. I've found the hand warmers will not get too hot but be careful as a burn will obviously not speed up healing! For foot blisters, placing the warmer inside a thick hiking sock works well.
4.2 Continuous Protein Intake
I have found that keeping a steady intake of protein, as well as good fat, also speeds up the healing process. It's particularly important to take some protein before bed time, as a lot of healing occurs while you sleep. If the body does not have a supply of protein available, it can't make repairs. It's also important to keep your calorie intake high enough. If you are dieting, then your body will slow down the healing process to conserve energy. Check out GOMAD Grazing for my approach to continuous protein intake.

