Difference between revisions of "Modified Nike Free"
User:Fellrnr (User talk:Fellrnr | contribs) |
User:Fellrnr (User talk:Fellrnr | contribs) |
||
| (12 intermediate revisions by 2 users not shown) | |||
| Line 1: | Line 1: | ||
| − | + | The [http://www.roadrunnersports.com/rrs/search/search-celebros.jsp?isLoggedIn=&isClubMember=&from=searchBox&Query=nike+free&x=0&y=0 Nike Free] is an ideal running shoe for modification. Instead of a separate cushioning midsole and a hard rubber outsole, the Free combines the two into a single layer. This cushioning is much tougher than a conventional shoe, so it withstands the abrasion without an outer sole. Modifying a conventional shoe requires removing the outsole, cutting away at the midsole, then reattaching the outsole. With the Free, you just remove what you don't want. (Note that these pictures use the Nike Free 3.0.2 as the starting point.) | |
| − | + | =Stage One - The Sole= | |
| − | |||
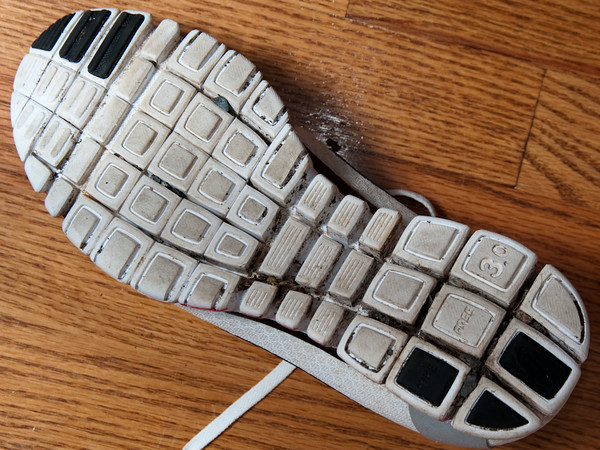
Here is an image of the underside of the unmodified shoe, which is my starting point. Notice the deep groves in the shoe and the lack of outsole (other than the small patches that are black). | Here is an image of the underside of the unmodified shoe, which is my starting point. Notice the deep groves in the shoe and the lack of outsole (other than the small patches that are black). | ||
| − | + | [[File:709446880_rsXZL-M.jpg]] | |
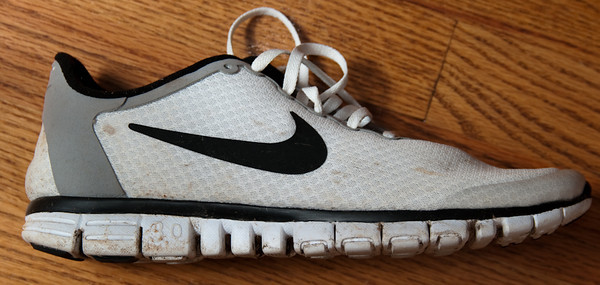
| − | + | As you can see here, the unmodified shoe has a much higher heel than forefoot. | |
| − | + | [[File:709446207_iqL6z-M.jpg]] | |
| − | As you can see here,the unmodified shoe has a much higher heel than forefoot. | ||
| − | |||
| − | |||
| − | |||
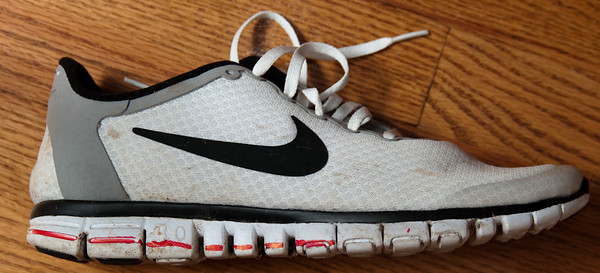
The first stage is to mark where the sole needs cutting. Do this approximately and conservatively first. It is best to remove slightly less than you need to, then try them out and remove some more if required. I find you need to remove material from not just the heel, but the arch support and right up to just behind the all of the foot. | The first stage is to mark where the sole needs cutting. Do this approximately and conservatively first. It is best to remove slightly less than you need to, then try them out and remove some more if required. I find you need to remove material from not just the heel, but the arch support and right up to just behind the all of the foot. | ||
| − | + | [[File:709446336_sLazM-M.jpg]] | |
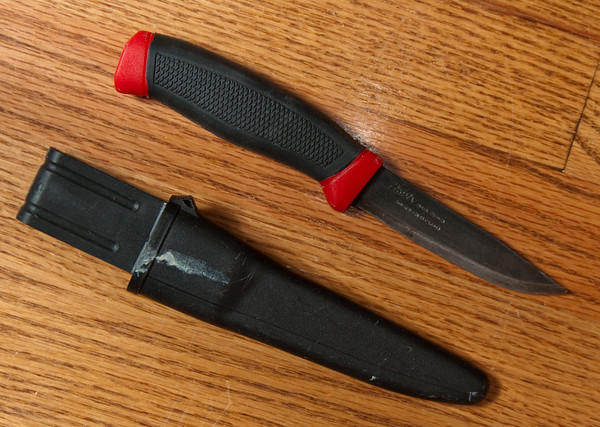
| − | + | I've tried quite an array of tools for modifying these [[Shoes]], and my preferred tool tool is a cheap sheath knife. The knife is a Clipper and is a remarkable knife for the price - I've abused mine horribly and it's still in great condition. '''Update''' Using an electric knife works much better. It works much faster and allows for higher precision - http://www.amazon.com/Cuisinart-CEK-40-Electric-Knife/dp/B00004WKI3 | |
| − | + | [[File:709446524_RCRA9-M.jpg]] | |
| − | I've tried quite an array of tools for modifying these | ||
| − | |||
| − | http:// | ||
| − | |||
Cutting away at the sole is harder than you might expect. The way the sole is in sections makes it a little easier, but only a little. | Cutting away at the sole is harder than you might expect. The way the sole is in sections makes it a little easier, but only a little. | ||
| − | + | [[File:709446703_csx7T-M.jpg]] | |
| − | |||
| − | |||
Here you can see how much of the sole was removed. | Here you can see how much of the sole was removed. | ||
| − | + | [[File:709447177_uPiwy-M.jpg]] | |
| − | |||
| − | |||
From the side, you get an idea of how far it has been cut down. Note how rough the cutting is - this seems to work fine. | From the side, you get an idea of how far it has been cut down. Note how rough the cutting is - this seems to work fine. | ||
| − | + | [[File:709447042_d3ctY-M.jpg]] | |
| − | + | I also shave the edges of the heel (you can see the electric knife in use here | |
| − | + | [[File:917615882_E72eP-M.jpg]] | |
| − | + | Here is the resulting heel shape | |
| − | See how the toes overlap the sides of the shoe and the shoe is a different shape? I've never understood why | + | [[File:917617487_U6rQr-M.jpg]] |
| − | + | =Stage Two - the toe box= | |
| − | + | See how the toes overlap the sides of the shoe and the shoe is a different shape? I've never understood why [[Shoes]] are not the shape of your feet. I did not have a problem with the toe box of the Free until I started wearing Vibram FiveFingers. Once my toes had become used to freedom, they were very unhappy with a toe box. | |
| − | + | [[File:709447471_RfGj2-M.jpg]] | |
| − | |||
Putting the shoe on, I can feel where the toes touch the side of the shoe. I mark the contact points on the shoe. Notice that there is a reasonable area where the shoe is away from the toes. I'll leave that intact and it will keep the shoe together. | Putting the shoe on, I can feel where the toes touch the side of the shoe. I mark the contact points on the shoe. Notice that there is a reasonable area where the shoe is away from the toes. I'll leave that intact and it will keep the shoe together. | ||
| − | + | [[File:709447633_emaK8-M.jpg]] | |
| − | |||
| − | |||
Once the toe box has been cut away, my toes are free. When I first did this as an experiment, I thought my toes would push out too far and cause a problem, but in practice this is fine. I've run up to 30 miles in this type of modified shoe without any problems. | Once the toe box has been cut away, my toes are free. When I first did this as an experiment, I thought my toes would push out too far and cause a problem, but in practice this is fine. I've run up to 30 miles in this type of modified shoe without any problems. | ||
| − | + | [[File:709447860_kcoNm-M.jpg]] | |
| − | + | =Stage Three - Traction?= | |
| − | + | The next stage may well be to add some extra traction for [[Running Trails]] or on ice. [http://www.skyrunner.com/screwshoe.htm http://www.skyrunner.com/screwshoe.htm]. However, talking to folks who have done this, the results are mixed at best. | |
| − | + | =Extreme Shoe Modifications= | |
| − | + | Modifications that go beyond safety to alleviate blister issues - [[Extreme Shoe Modifications]]. | |
| − | + | =See Also= | |
| − | The next stage may well be to add some extra traction for | + | * [[The Science of Running Shoes]] |
| + | * [[Shoes| The Best Shoes for Runners]] | ||
| + | * [[The Journey to Minimalist Running]] | ||
| + | * [[Toughening Feet]] | ||
| + | * Modified Nike Frees - http://hhollines.blogspot.com/2010/06/zero-drop-nike-free-30-review.html | ||
| + | [[Category:Review]] | ||
Latest revision as of 04:30, 2 December 2014
The Nike Free is an ideal running shoe for modification. Instead of a separate cushioning midsole and a hard rubber outsole, the Free combines the two into a single layer. This cushioning is much tougher than a conventional shoe, so it withstands the abrasion without an outer sole. Modifying a conventional shoe requires removing the outsole, cutting away at the midsole, then reattaching the outsole. With the Free, you just remove what you don't want. (Note that these pictures use the Nike Free 3.0.2 as the starting point.)
Contents
1 Stage One - The Sole
Here is an image of the underside of the unmodified shoe, which is my starting point. Notice the deep groves in the shoe and the lack of outsole (other than the small patches that are black).
 As you can see here, the unmodified shoe has a much higher heel than forefoot.
 The first stage is to mark where the sole needs cutting. Do this approximately and conservatively first. It is best to remove slightly less than you need to, then try them out and remove some more if required. I find you need to remove material from not just the heel, but the arch support and right up to just behind the all of the foot.
 I've tried quite an array of tools for modifying these Shoes, and my preferred tool tool is a cheap sheath knife. The knife is a Clipper and is a remarkable knife for the price - I've abused mine horribly and it's still in great condition. Update Using an electric knife works much better. It works much faster and allows for higher precision - http://www.amazon.com/Cuisinart-CEK-40-Electric-Knife/dp/B00004WKI3
 Cutting away at the sole is harder than you might expect. The way the sole is in sections makes it a little easier, but only a little.
File:709446703 csx7T-M.jpg
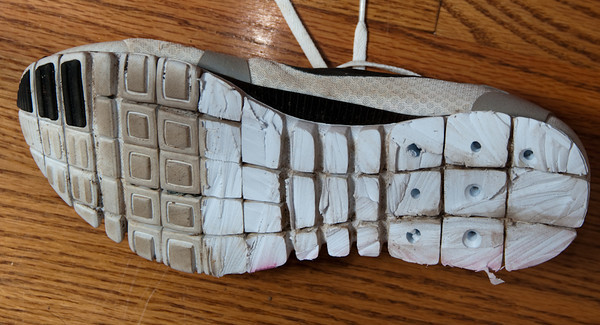
Here you can see how much of the sole was removed.
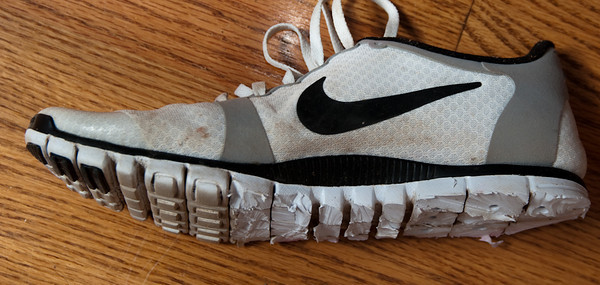
 From the side, you get an idea of how far it has been cut down. Note how rough the cutting is - this seems to work fine.
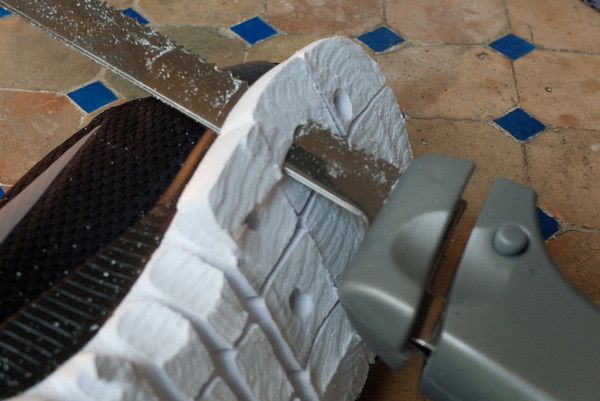
 I also shave the edges of the heel (you can see the electric knife in use here
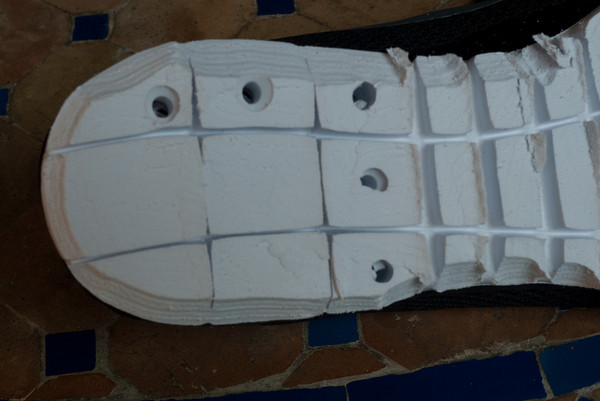
 Here is the resulting heel shape
2 Stage Two - the toe box
See how the toes overlap the sides of the shoe and the shoe is a different shape? I've never understood why Shoes are not the shape of your feet. I did not have a problem with the toe box of the Free until I started wearing Vibram FiveFingers. Once my toes had become used to freedom, they were very unhappy with a toe box.
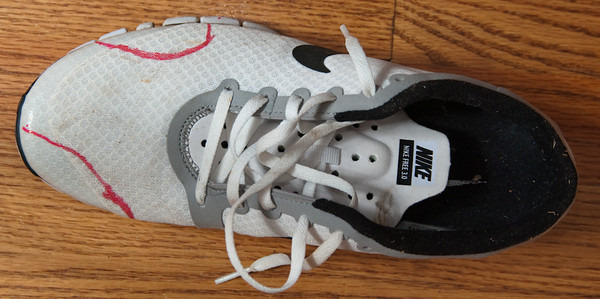
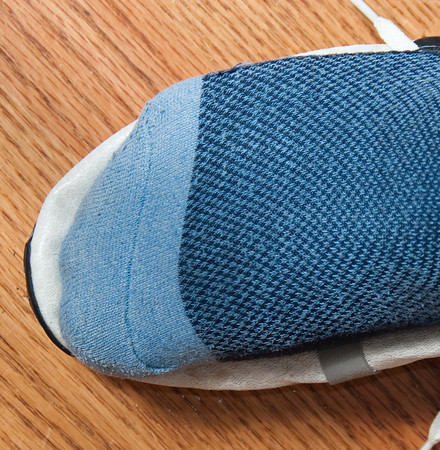 Putting the shoe on, I can feel where the toes touch the side of the shoe. I mark the contact points on the shoe. Notice that there is a reasonable area where the shoe is away from the toes. I'll leave that intact and it will keep the shoe together.
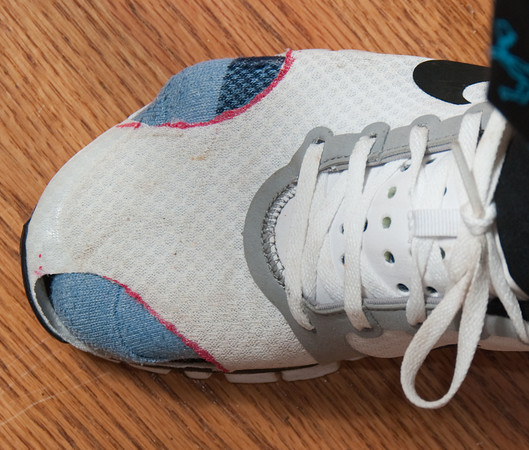
 Once the toe box has been cut away, my toes are free. When I first did this as an experiment, I thought my toes would push out too far and cause a problem, but in practice this is fine. I've run up to 30 miles in this type of modified shoe without any problems.
3 Stage Three - Traction?
The next stage may well be to add some extra traction for Running Trails or on ice. http://www.skyrunner.com/screwshoe.htm. However, talking to folks who have done this, the results are mixed at best.
4 Extreme Shoe Modifications
Modifications that go beyond safety to alleviate blister issues - Extreme Shoe Modifications.
5 See Also
- Category:Pages with broken file links
- Category:Review