Difference between revisions of "High Speed Video Analysis"
User:Fellrnr (User talk:Fellrnr | contribs) |
User:Fellrnr (User talk:Fellrnr | contribs) |
||
| (One intermediate revision by the same user not shown) | |||
| Line 1: | Line 1: | ||
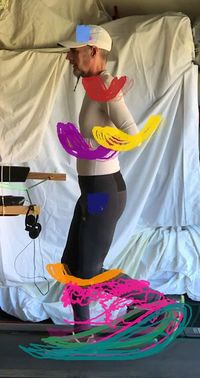
[[File:Kinovea1.jpg|right|thumb|300px|An example of the analysis from Kinovea. You can see a number of markers being tracked. The blue elbow marker has the circle of movement shown, and the knee and shoulder have acceleration displayed.]] | [[File:Kinovea1.jpg|right|thumb|300px|An example of the analysis from Kinovea. You can see a number of markers being tracked. The blue elbow marker has the circle of movement shown, and the knee and shoulder have acceleration displayed.]] | ||
| − | High Speed Video is a great way of analyzing your [[Running Form]]. While high end equipment is extremely expensive, the latest smartphones are quite capable and the software is freely available. I'll focus on using the Kinovea software, though I'll look at some of the mobile apps in the near future. | + | High Speed Video is a great way of analyzing your [[Running Form]]. While high end equipment is extremely expensive, the latest smartphones are quite capable and the software is freely available. I'll focus on using the Kinovea software, though I'll look at some of the mobile apps in the near future. I believe you can use Kinovea to evaluate [[Foot Strike]] (initial and maximum force), [[Vertical Oscillation]], [[Overstriding]], [[Arm Position| Arm Swing]], Forward lean, and Impact. I'll add details of how to do this in the near future. |
=Equipment= | =Equipment= | ||
==Camera== | ==Camera== | ||
| Line 7: | Line 7: | ||
It should be perfectly possible to video a runner outside, but you'll only get a small number of strides, and it can be tricky to analyze the motion as effectively as you can when recording on a treadmill. The main downside of a treadmill is that most runners have a slightly different running form compared with running outside. Ideally, you want a treadmill that doesn't have a side rail that gets in the way of the camera's view of the runner. This is mostly an issue with measuring movement of the hip from the side, so it's not a huge deal. | It should be perfectly possible to video a runner outside, but you'll only get a small number of strides, and it can be tricky to analyze the motion as effectively as you can when recording on a treadmill. The main downside of a treadmill is that most runners have a slightly different running form compared with running outside. Ideally, you want a treadmill that doesn't have a side rail that gets in the way of the camera's view of the runner. This is mostly an issue with measuring movement of the hip from the side, so it's not a huge deal. | ||
==Markers== | ==Markers== | ||
| − | The Kinovea software tracks motion using visual markers | + | The Kinovea software tracks motion using visual markers, and I've found these <jfs id=" B010L610EC " noreferb="true" n="50 Colored Ping Pong Balls," nonl="t" /> worked pretty well. I simply use duct tape looped around to stick them to my clothing. You can read more about the various types of markers I've tested further down this page, and there are other approaches that might work for your situation. I put markers on my forefoot, heel, ankle, knee, hip, shoulder, wrist, and head. Which locations you choose to track will depend on what you're trying to measure. |
| + | ==Clothing== | ||
| + | It's important to wear clothing that is skintight and plain. Loose clothing will move independent of your body and give incorrect tracking. If the clothing is patterned, it's likely to confuse Kinovea. I wear black tights and a white long-sleeved compression top. Wearing black socks to match the black tights helps avoid create a colored area that can confuse the tracking. Initially I chose predominantly black shoes and covered them with black duct tape for use with white markers. After some experimentation, I found that as long as the marker is a strongly contrasting color to the shoe, and the shoe doesn't have any of the marker color on it, there is no problem. | ||
==Room== | ==Room== | ||
| − | The room you use to take the measurements is surprisingly important. It's critical you have lots of light, so that the cameras shutter speed is fast enough to freeze the motion. You also need enough distance between the treadmill and where you set up the camera that you're not getting perspective distortion. A plain background behind the treadmill is best, though you can get the software to work against a visually noisy background. | + | The room you use to take the measurements is surprisingly important. It's critical you have lots of light, so that the cameras shutter speed is fast enough to freeze the motion. You also need enough distance between the treadmill and where you set up the camera that you're not getting perspective distortion. A plain background behind the treadmill is best, though you can get the software to work against a visually noisy background. The room should also have a fairly solid floor, so that the running doesn't balance the camera. Adding something of a known size into the frame at the same distance as the runner is needed if you want to calibrate measurements. |
=Recording = | =Recording = | ||
It's worth spending a little time to get the camera positioned correctly. You want the runner to fill most of the frame so that you're not wasting resolution. If you want to evaluate the runner with the treadmill at an incline, don't forget to allow for this when positioning the camera. You want the camera positioned perpendicular to the runner, and as level as possible. Ensure the camera has the near edge of the treadmill in view so that it can see each foot strike. I used a Bluetooth remote control to record my running, and I'd recommend using the remote control even if you have a friend helping you. You don't want to touch the phone when starting and stopping recording as any camera shake will cause problems. I'd recommend recording several relatively short clips (~30 seconds), as high-speed video takes up a lot of memory. The more powerful your PC, the longer the segment you'll be able to process. | It's worth spending a little time to get the camera positioned correctly. You want the runner to fill most of the frame so that you're not wasting resolution. If you want to evaluate the runner with the treadmill at an incline, don't forget to allow for this when positioning the camera. You want the camera positioned perpendicular to the runner, and as level as possible. Ensure the camera has the near edge of the treadmill in view so that it can see each foot strike. I used a Bluetooth remote control to record my running, and I'd recommend using the remote control even if you have a friend helping you. You don't want to touch the phone when starting and stopping recording as any camera shake will cause problems. I'd recommend recording several relatively short clips (~30 seconds), as high-speed video takes up a lot of memory. The more powerful your PC, the longer the segment you'll be able to process. | ||
| Line 23: | Line 25: | ||
* The first thing to do is to adjust playback speed so that you're playing the video in slow motion. There is a slider bar just above and right of the playback buttons, so slide this to the left to slow things down. | * The first thing to do is to adjust playback speed so that you're playing the video in slow motion. There is a slider bar just above and right of the playback buttons, so slide this to the left to slow things down. | ||
* You normally set up a "working window" as a subset of the video clip. For performance, only a small subset of the video can be loaded into memory for analysis. Play video, or click on the main timeline to choose your starting point, then click the "[" button to mark the start. Likewise, at the end of your chosen section use the "]" button. | * You normally set up a "working window" as a subset of the video clip. For performance, only a small subset of the video can be loaded into memory for analysis. Play video, or click on the main timeline to choose your starting point, then click the "[" button to mark the start. Likewise, at the end of your chosen section use the "]" button. | ||
| − | * To track movement, moved to the beginning of your working window. You'll want to right click on a marker | + | * If you want to measure distances, you will need to add a line and calibrate it. Simply click on the line tool just below the video window and draw a line over your known measurement. Then right click and select "calibrate", setting the correct distance. The measure should be adjusted for the perspective difference if the known distance is offset from the thing you are measuring. |
| − | * Once you'd set your track point you'll see two concentric rectangles and a small cross. The cross marks of the center of the object being tracked, and the inner rectangle should surround your marker, with a little bit of the background included. The larger rectangle is the search window. For each frame, the software looks for the image in the small rectangle within the area defined by the larger rectangle. Getting these areas right is critical to successful tracking. If you right-click near the cross and select "configuration…" You'll get a dialogue that will allow you to tweak the size of the two rectangles.<br/>[[File:KinoveaConfigure.jpg|none|thumb|400px|]] | + | * To track movement, moved to the beginning of your working window. You'll want to right click on a marker and select "track path". It's easier to click the middle of your marker if you're zoomed in, which you do using control and the mouse wheel. |
| − | * If you click play, or frame advance, you'll see the line made by the marker recorded on the playback window. If the line doesn't track your marker, but jumps around, it's a sign that the software is finding a better match for your object window within the search window. Tweaking these can often, but not always resolve the problem. | + | * Once you'd set your track point you'll see two concentric rectangles and a small cross. The cross marks of the center of the object being tracked, and the inner rectangle should surround your marker, with a little bit of the background included. The larger rectangle is the search window. For each frame, the software looks for the image in the small rectangle within the area defined by the larger rectangle. Getting these areas right is critical to successful tracking. If you right-click near the cross and select "configuration…" You'll get a dialogue that will allow you to tweak the size of the two rectangles. <br/>[[File:KinoveaConfigure.jpg|none|thumb|400px|]] |
| + | * If you click play, or frame advance, you'll see the line made by the marker recorded on the playback window. If the line doesn't track your marker, but jumps around, it's a sign that the software is finding a better match for your object window within the search window. Tweaking these can often, but not always resolve the problem. The first time you play after asking Kinovea to track an object it will do the analysis, thereafter it will replay the track it recorded. You can see this analyzed section of the video as a pink bar in the time window. | ||
* Within the configuration window, you can also set the software to display a metric such as acceleration, speed, etc. You can use this to determine the frame with the highest acceleration, or the slowest speed, or whatever else it is you're interested in. For instance, tracking vertical acceleration of a torso marker and looking for the frame with the maximum value would tell you when the greatest landing forces are likely to be. | * Within the configuration window, you can also set the software to display a metric such as acceleration, speed, etc. You can use this to determine the frame with the highest acceleration, or the slowest speed, or whatever else it is you're interested in. For instance, tracking vertical acceleration of a torso marker and looking for the frame with the maximum value would tell you when the greatest landing forces are likely to be. | ||
* There is another option on the configuration dialog called "display rotation circle." This will show the circle around which a market is moving. | * There is another option on the configuration dialog called "display rotation circle." This will show the circle around which a market is moving. | ||
* You can measure angles by clicking the angle icon and then clicking on the video window. You then move the three points so they line up with the joint you're trying to measure, and it will display the angle. With the experimental version, you can right click on one of the points and select "track path" and the software will track the three markers, showing the changing angle as things progress. The problem I found with this functionality is that you can't tweak the object and search windows for each point, so it easily gets confused unless you have a really clear marker. | * You can measure angles by clicking the angle icon and then clicking on the video window. You then move the three points so they line up with the joint you're trying to measure, and it will display the angle. With the experimental version, you can right click on one of the points and select "track path" and the software will track the three markers, showing the changing angle as things progress. The problem I found with this functionality is that you can't tweak the object and search windows for each point, so it easily gets confused unless you have a really clear marker. | ||
| + | =Appendix – Testing Markers= | ||
| + | The Kinovea software tracks motion using visual markers. These markers should be round, as the software doesn't understand a rotating marker. So, if you put a red square on your ankle, as that square turns with your leg movement, the software will lose track. You also want the marker to be on a plain background that has good contrast with the marker. I tested a number of approaches to markers, and I found that colored ping-pong balls work best. | ||
| + | ==Colored Ping-Pong Balls== | ||
| + | I started off using standard ping-pong balls, which work well against a dark background, but I needed something that would work with other colors of clothing and shoes. I tried painting standard white ping-pong balls, and then discovered that you could buy ping-pong balls in assorted colors quite cheaply. I found these <jfs id=" B010L610EC " noreferb="true" n="50 Colored Ping Pong Balls, " nonl="t"/> worked pretty well. There is a wide enough variety of colors to work on different backgrounds. I attached the ping-pong balls to my clothing using a loop of duct tape which worked fine in most cases. Ordinary double-sided sticky tape is quite strong enough, but I've not experimented with any of the extra sticky varieties. Touching the ping-pong balls to running shoes is a little trickier. The duct tape loop works okay, but they're far more likely to fall off a shoe than clothing. I did permanently attach a pair of ping-pong balls to some older shoes which works really well if that's an option. I covered the side of the shoe in black duct tape, then glued the ping-pong ball to it. If you use this approach, I'd recommend dropping the duct tape with sandpaper first, partly to reduce any reflections, and partly to give it a better key for the glue. I also found cutting a small X into the ping-pong ball where it's glued on helps strengthen the bond. I found that these colored ping-pong balls were the easiest to use, and produced the most useful tracks of any of the markers I've tried. | ||
| + | {| class="wikitable" style="margin-left: auto; margin-right: auto; border: none;" | ||
| + | |- valign="top" | ||
| + | |[[File:Big Balls.jpg|none|thumb|200px|This is a close up of the ping-pong balls with the loop of duct tape attached.]] | ||
| + | |[[File:Bigballs Shoes.jpg|none|thumb|200px|Here's a close up of the ping-pong ball on my shoes. You can see that the balls are stuck to duct tape that goes over the reflective patterns on the shoes.]] | ||
| + | |- valign="top" | ||
| + | |[[File:Big Balls 2-SS.jpg|none|thumb|200px|This is how the balls look overall. You can see that the shoulder ping-pong ball still looks round even though my shoulder is rotated away, if this was a flat bit of circular sticky tape, the software would struggle as it would've become partly out of sight.]] | ||
| + | |[[File:Big Balls 2.jpg|none|thumb|200px|This is the result of Kinovea tracking a number of strides. This is too many tracks over too many strides to be useful for analysis, it's only done to show how successful the marker is at being tracked.]] | ||
| + | |} | ||
| + | ==Colored Tape Markers== | ||
| + | The advantage of using sticky tape is that you're more likely to have some hanging around that you can improvise with. I simply cut some circles out of blue decorators masking tape, and this worked reasonably well. I think there were some issues with my circles being rather roughly cut, and the blue color was not quite enough contrast against my black tights. I'm going to retest with some circular stickers of brighter colors. | ||
| + | {| class="wikitable" style="margin-left: auto; margin-right: auto; border: none;" | ||
| + | |- valign="top" | ||
| + | |[[File:Kinovea Tape-SS.jpg|none|thumb|200px|Here's the tape markers in use. You can see that the markers on the shoulder and knee no longer look round due to the slight rotation of the joint, something that doesn't happen with the spherical ping-pong balls.]] | ||
| + | |[[File:Kinovea Tape.jpg|none|thumb|200px|Like the image of the ping-pong balls above, this is the tracks from many strides. You can see the upper body markers were tracked fairly well, but some of the leg markers failed, and the tracks wander off on their own.]] | ||
| + | |} | ||
| + | ==LED Lights== | ||
| + | Juanma K suggested I try using LEDs as markers. He'd successfully used string of LEDs with the unwanted lights taped over. I found an alternative style of LED that are individual lights - <jfs id="B01JYDGC4Q" noreferb="true" n="30 LED Party Lights," nonl="t"/>. These were quite bright and are easy to tape on. The main downside to these LEDs as markers is it you need fairly low light for them to stand out, which can make it tricky to see the overall position of the rest of your body. It can also be a little tricky running in very low light on a treadmill. The upside is that you don't have to worry about your clothing or background colors, especially if you use them in very low light. | ||
| + | {| class="wikitable" style="margin-left: auto; margin-right: auto; border: none;" | ||
| + | |- valign="top" | ||
| + | |[[File:LED Lights (2).jpg|none|thumb|200px|Here's the LED lights taped to a running shoe, one illuminated and one not.]] | ||
| + | |[[File:LED Lights (3).jpg|none|thumb|200px|This is a close up of one of the little LED lights. It shown here turned off so that you can see it more clearly. Each LED has 3 tiny coin style batteries to power it. You twisted the end to turn the light on and off.]] | ||
| + | |[[File:LED Lights (1).jpg|none|thumb|200px|This is a close up of the light illuminated. It's quite bright, but does tend to direct most of the light in the direction of the tube. This means that when it's taped to you the light is not pointing at the camera.]] | ||
| + | |- valign="top" | ||
| + | |[[File:Kinovea Lights Dark2.jpg|none|thumb|200px|In near darkness these lights work amazingly well for tracking. It's trivial to set up the object and search Windows, and there are no concerns with clothing color, or background patterns.]] | ||
| + | |[[File:Kinovea Lights Dim.jpg|none|thumb|200px|You might be able to get these LED markers to work in dim conditions, but I found it rather tricky. In brighter light than this it's impossible to track the LEDs.]] | ||
| + | |} | ||
| + | ==Miniature Ping-Pong Balls== | ||
| + | I thought that a smaller sized ping-pong ball would work better than its launch her cousin. My expectation was the smallest size would be a little more precise, and the lighter weight would be a little more stable. I purchased some <jfs id="B011RAAJRU" noreferb="true" n="Mini Ping Pong Balls," nonl="t"/> that are 0.75"/19mm rather than the normal Ping Pong size of 1.5"/40mm. in practice, I found it rather harder to get Kinovea to track these small balls. I had to tweak the object and search windows to be quite a bit smaller, and even then it lost track of the balls on my lower legs. The upper body markers which I'd painted orange worked okay. | ||
| + | {| class="wikitable" style="margin-left: auto; margin-right: auto; border: none;" | ||
| + | |- valign="top" | ||
| + | |[[File:Miniballs.jpg|none|thumb|200px|The Mini ping-pong balls with a full-sized ping-pong ball for comparison. You can see the small loops of duct tape I used the stick them in place.]] | ||
| + | |[[File:MIniballs Shoes.jpg|none|thumb|200px| I glued a couple of mini ping-pong balls to some black duct tape hide stuck to my shoes.]] | ||
| + | |[[File:Painted Miniballs.jpg|none|thumb|200px|Here's the painting of the ping-pong balls. Spray painting ping-pong balls can be quite exciting, as they so light the spray from the can sends them spinning out of control. I'm sure that this is an excellent technique for applying paint to rectum objects, and might be an awesome experimental arts technique.]] | ||
| + | |- valign="top" | ||
| + | |[[File:Kinovea Miniballs1-SS.jpg|none|thumb|200px|Here you can see the mini ping-pong balls in place.]] | ||
| + | |[[File:Kinovea Miniballs1.jpg|none|thumb|200px|You can see the tracks on the lower legs are getting lost. (The lower legs are harder to track at least partly because they're faster moving.)]] | ||
Latest revision as of 06:31, 26 January 2020
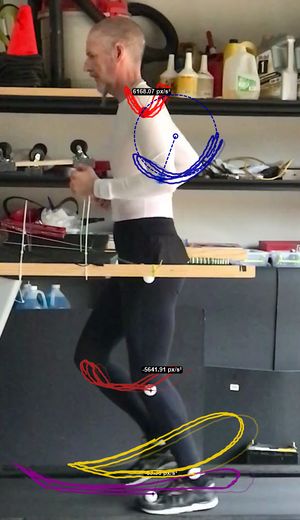
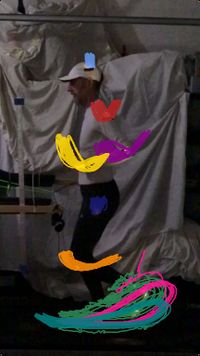
High Speed Video is a great way of analyzing your Running Form. While high end equipment is extremely expensive, the latest smartphones are quite capable and the software is freely available. I'll focus on using the Kinovea software, though I'll look at some of the mobile apps in the near future. I believe you can use Kinovea to evaluate Foot Strike (initial and maximum force), Vertical Oscillation, Overstriding, Arm Swing, Forward lean, and Impact. I'll add details of how to do this in the near future.
Contents
1 Equipment
1.1 Camera
You'll need a camera capable of recording high-speed video at a reasonable resolution. In the past, I've used a GoPro, but their fisheye distortion is a less than ideal. The iPhone 6 & 7, and the Samsung Galaxy S7 will all record HD (1280x720) at 240 Frames Per Second (FPS), which is eight times as fast as typical video. I found that this resolution and frame rate is perfectly adequate for analyzing a runner. Using a lower frame rate and a high resolution did not produce as good results. I found that using the zoom lens on my iPhone 7+ from further away produced better results than the wide-angle lens, as there is less perspective distortion. You'll also need a tripod and an adapter for your phone. I'm lucky enough to have a professional grade, heavy-duty tripod, but something far simpler should suffice. I purchased a cheap tripod adapter and Bluetooth remote control at the same time. (Error: Could not parse data from Amazon!)
1.2 Treadmill
It should be perfectly possible to video a runner outside, but you'll only get a small number of strides, and it can be tricky to analyze the motion as effectively as you can when recording on a treadmill. The main downside of a treadmill is that most runners have a slightly different running form compared with running outside. Ideally, you want a treadmill that doesn't have a side rail that gets in the way of the camera's view of the runner. This is mostly an issue with measuring movement of the hip from the side, so it's not a huge deal.
1.3 Markers
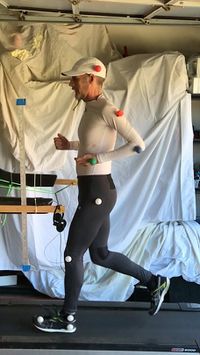
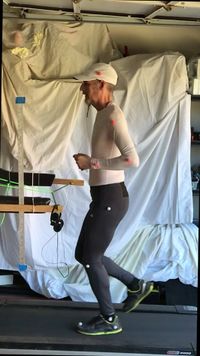
The Kinovea software tracks motion using visual markers, and I've found these Error: Could not parse data from Amazon! worked pretty well. I simply use duct tape looped around to stick them to my clothing. You can read more about the various types of markers I've tested further down this page, and there are other approaches that might work for your situation. I put markers on my forefoot, heel, ankle, knee, hip, shoulder, wrist, and head. Which locations you choose to track will depend on what you're trying to measure.
1.4 Clothing
It's important to wear clothing that is skintight and plain. Loose clothing will move independent of your body and give incorrect tracking. If the clothing is patterned, it's likely to confuse Kinovea. I wear black tights and a white long-sleeved compression top. Wearing black socks to match the black tights helps avoid create a colored area that can confuse the tracking. Initially I chose predominantly black shoes and covered them with black duct tape for use with white markers. After some experimentation, I found that as long as the marker is a strongly contrasting color to the shoe, and the shoe doesn't have any of the marker color on it, there is no problem.
1.5 Room
The room you use to take the measurements is surprisingly important. It's critical you have lots of light, so that the cameras shutter speed is fast enough to freeze the motion. You also need enough distance between the treadmill and where you set up the camera that you're not getting perspective distortion. A plain background behind the treadmill is best, though you can get the software to work against a visually noisy background. The room should also have a fairly solid floor, so that the running doesn't balance the camera. Adding something of a known size into the frame at the same distance as the runner is needed if you want to calibrate measurements.
2 Recording
It's worth spending a little time to get the camera positioned correctly. You want the runner to fill most of the frame so that you're not wasting resolution. If you want to evaluate the runner with the treadmill at an incline, don't forget to allow for this when positioning the camera. You want the camera positioned perpendicular to the runner, and as level as possible. Ensure the camera has the near edge of the treadmill in view so that it can see each foot strike. I used a Bluetooth remote control to record my running, and I'd recommend using the remote control even if you have a friend helping you. You don't want to touch the phone when starting and stopping recording as any camera shake will cause problems. I'd recommend recording several relatively short clips (~30 seconds), as high-speed video takes up a lot of memory. The more powerful your PC, the longer the segment you'll be able to process.
3 Evaluation
Kinovea is fairly easy to use, and there's a good online help section. That said, there's a few caveats that you should be aware of, so let me walk you through the process.
- If you recorded your video in portrait mode, you'll need to rotate it before importing into Kinovea. I used "Rotate & Flip" on the iPhone prior to transferring it, which worked okay. Hopefully the next version of the Kinovea will understand rotated video, as this is a pain.
- The next step is to transfer the video to your PC. I used Dropbox, but there are many other solutions.
- I'd recommend using the experimental version of Kinovea 0.8.25, as it has some nice additional functionality, and appears to be completely stable. Download from [1]
- The first time you start up Kinovea, I'd recommend changing some of the preferences. (Options menu, then select preferences.)
- Click on drawings, then the tracking tab. I find setting the object window to 30x30 pixels and the search window to 90x90 pixels is a good starting point. The default uses a percentage of the overall video window and is too big, causing tracking problems.
- If you have a powerful PC, click playback, then the memory tab. Increase the working zone to 30 seconds and memory to 1024 Mb.
- It's fairly obvious how to open your file.
- The first thing to do is to adjust playback speed so that you're playing the video in slow motion. There is a slider bar just above and right of the playback buttons, so slide this to the left to slow things down.
- You normally set up a "working window" as a subset of the video clip. For performance, only a small subset of the video can be loaded into memory for analysis. Play video, or click on the main timeline to choose your starting point, then click the "[" button to mark the start. Likewise, at the end of your chosen section use the "]" button.
- If you want to measure distances, you will need to add a line and calibrate it. Simply click on the line tool just below the video window and draw a line over your known measurement. Then right click and select "calibrate", setting the correct distance. The measure should be adjusted for the perspective difference if the known distance is offset from the thing you are measuring.
- To track movement, moved to the beginning of your working window. You'll want to right click on a marker and select "track path". It's easier to click the middle of your marker if you're zoomed in, which you do using control and the mouse wheel.
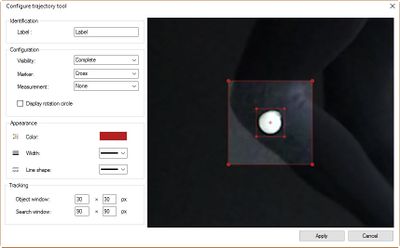
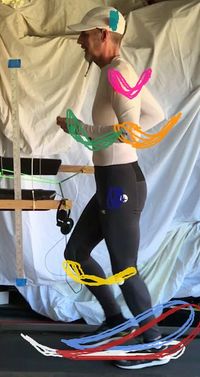
- Once you'd set your track point you'll see two concentric rectangles and a small cross. The cross marks of the center of the object being tracked, and the inner rectangle should surround your marker, with a little bit of the background included. The larger rectangle is the search window. For each frame, the software looks for the image in the small rectangle within the area defined by the larger rectangle. Getting these areas right is critical to successful tracking. If you right-click near the cross and select "configuration…" You'll get a dialogue that will allow you to tweak the size of the two rectangles.
- If you click play, or frame advance, you'll see the line made by the marker recorded on the playback window. If the line doesn't track your marker, but jumps around, it's a sign that the software is finding a better match for your object window within the search window. Tweaking these can often, but not always resolve the problem. The first time you play after asking Kinovea to track an object it will do the analysis, thereafter it will replay the track it recorded. You can see this analyzed section of the video as a pink bar in the time window.
- Within the configuration window, you can also set the software to display a metric such as acceleration, speed, etc. You can use this to determine the frame with the highest acceleration, or the slowest speed, or whatever else it is you're interested in. For instance, tracking vertical acceleration of a torso marker and looking for the frame with the maximum value would tell you when the greatest landing forces are likely to be.
- There is another option on the configuration dialog called "display rotation circle." This will show the circle around which a market is moving.
- You can measure angles by clicking the angle icon and then clicking on the video window. You then move the three points so they line up with the joint you're trying to measure, and it will display the angle. With the experimental version, you can right click on one of the points and select "track path" and the software will track the three markers, showing the changing angle as things progress. The problem I found with this functionality is that you can't tweak the object and search windows for each point, so it easily gets confused unless you have a really clear marker.
4 Appendix – Testing Markers
The Kinovea software tracks motion using visual markers. These markers should be round, as the software doesn't understand a rotating marker. So, if you put a red square on your ankle, as that square turns with your leg movement, the software will lose track. You also want the marker to be on a plain background that has good contrast with the marker. I tested a number of approaches to markers, and I found that colored ping-pong balls work best.
4.1 Colored Ping-Pong Balls
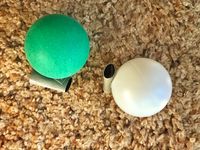
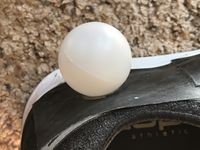
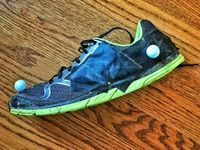
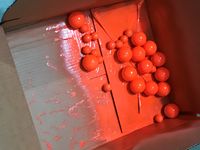
I started off using standard ping-pong balls, which work well against a dark background, but I needed something that would work with other colors of clothing and shoes. I tried painting standard white ping-pong balls, and then discovered that you could buy ping-pong balls in assorted colors quite cheaply. I found these Error: Could not parse data from Amazon! worked pretty well. There is a wide enough variety of colors to work on different backgrounds. I attached the ping-pong balls to my clothing using a loop of duct tape which worked fine in most cases. Ordinary double-sided sticky tape is quite strong enough, but I've not experimented with any of the extra sticky varieties. Touching the ping-pong balls to running shoes is a little trickier. The duct tape loop works okay, but they're far more likely to fall off a shoe than clothing. I did permanently attach a pair of ping-pong balls to some older shoes which works really well if that's an option. I covered the side of the shoe in black duct tape, then glued the ping-pong ball to it. If you use this approach, I'd recommend dropping the duct tape with sandpaper first, partly to reduce any reflections, and partly to give it a better key for the glue. I also found cutting a small X into the ping-pong ball where it's glued on helps strengthen the bond. I found that these colored ping-pong balls were the easiest to use, and produced the most useful tracks of any of the markers I've tried.
4.2 Colored Tape Markers
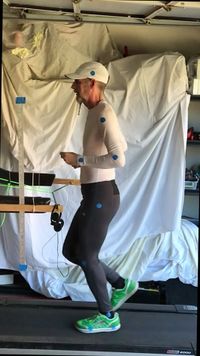
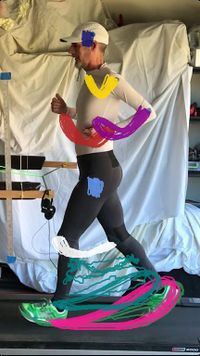
The advantage of using sticky tape is that you're more likely to have some hanging around that you can improvise with. I simply cut some circles out of blue decorators masking tape, and this worked reasonably well. I think there were some issues with my circles being rather roughly cut, and the blue color was not quite enough contrast against my black tights. I'm going to retest with some circular stickers of brighter colors.
4.3 LED Lights
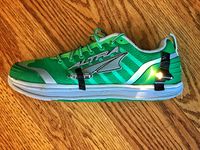
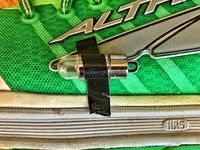
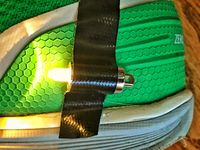
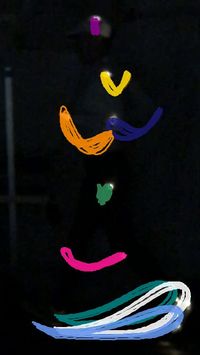
Juanma K suggested I try using LEDs as markers. He'd successfully used string of LEDs with the unwanted lights taped over. I found an alternative style of LED that are individual lights - Error: Could not parse data from Amazon!. These were quite bright and are easy to tape on. The main downside to these LEDs as markers is it you need fairly low light for them to stand out, which can make it tricky to see the overall position of the rest of your body. It can also be a little tricky running in very low light on a treadmill. The upside is that you don't have to worry about your clothing or background colors, especially if you use them in very low light.
4.4 Miniature Ping-Pong Balls
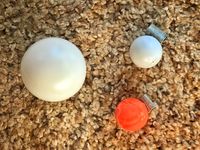
I thought that a smaller sized ping-pong ball would work better than its launch her cousin. My expectation was the smallest size would be a little more precise, and the lighter weight would be a little more stable. I purchased some Error: Could not parse data from Amazon! that are 0.75"/19mm rather than the normal Ping Pong size of 1.5"/40mm. in practice, I found it rather harder to get Kinovea to track these small balls. I had to tweak the object and search windows to be quite a bit smaller, and even then it lost track of the balls on my lower legs. The upper body markers which I'd painted orange worked okay.
