Difference between revisions of "Best Hydration Systems"
User:Fellrnr (User talk:Fellrnr | contribs) |
User:Fellrnr (User talk:Fellrnr | contribs) m (comment: batch update) |
||
| (3 intermediate revisions by the same user not shown) | |||
| Line 1: | Line 1: | ||
Correct [[Practical Hydration| hydration]] is of vital importance, and sometimes it is necessary to carry your drinks while running. '''Remember to drink based on your thirst, as over hydration is dangerous and can be fatal, while [[The Science Of Hydration| dehydration]] is far less of an issue than most people believe.''' Carrying fluids is always inconvenient, so choosing a hydration system is a matter of finding the least bad approach. There are several options open to you: | Correct [[Practical Hydration| hydration]] is of vital importance, and sometimes it is necessary to carry your drinks while running. '''Remember to drink based on your thirst, as over hydration is dangerous and can be fatal, while [[The Science Of Hydration| dehydration]] is far less of an issue than most people believe.''' Carrying fluids is always inconvenient, so choosing a hydration system is a matter of finding the least bad approach. There are several options open to you: | ||
| − | * '''Handheld bottle'''. Because the bottle is in your hand, you don't have problems with it jostling, rubbing, or banging against you. However the bottle occupies one (or both) of your hands | + | * '''Handheld bottle'''. Because the bottle is in your hand, you don't have problems with it jostling, rubbing, or banging against you. However, the bottle occupies one (or both) of your hands and can tire your arms. In some situations, it can also change your biomechanics and running form. |
* '''Waist pack'''. Putting your fluids around your waist frees up your hands and moves the weight onto your body. You can carry more fluid in this position than in a handheld bottle. Unfortunately, waist packs either put pressure on to your abdomen, which causes digestive problems, or it puts pressure on to your hips, causing the problems in the muscles of your hips and legs. Waist packs are particularly problematic for the ITB, as they put pressure on the activating muscle (TFL). | * '''Waist pack'''. Putting your fluids around your waist frees up your hands and moves the weight onto your body. You can carry more fluid in this position than in a handheld bottle. Unfortunately, waist packs either put pressure on to your abdomen, which causes digestive problems, or it puts pressure on to your hips, causing the problems in the muscles of your hips and legs. Waist packs are particularly problematic for the ITB, as they put pressure on the activating muscle (TFL). | ||
* '''Back pack'''. Using a back pack allows for the greatest quantity of fluid and keeps the weight on your shoulders and back which are stronger than your arms or abdomen. The downside to a backpack is that they tend to bounce and chafe while running. | * '''Back pack'''. Using a back pack allows for the greatest quantity of fluid and keeps the weight on your shoulders and back which are stronger than your arms or abdomen. The downside to a backpack is that they tend to bounce and chafe while running. | ||
| Line 88: | Line 88: | ||
|} | |} | ||
=Running Packs= | =Running Packs= | ||
| − | If you need to run all day self-supported, you'll need more than a hydration backpack. I've found that 10-15L is a reasonable compromise on capacity and weight. These packs will carry 2-3L of fluid, plus extra food and clothing in case conditions change. I tested a number of packs with a standard load of a 2L bladder, two ensure drinks, a light, waterproof top, thermal top, hat, gloves, clif bar, and six GUs. The contents end up weighing 120oz/3.4Kg/7.5Lb, which is more than I'd like, and a challenge for a running pack. I've been using the Nathan Synergy Pack for some years, and its shortcomings have led me to evaluate a range of running packs. I've ranked them roughly in priority order, with the Synergy pack at the end as a reference. | + | If you need to [[Self Supported Runs| run all day self-supported]], you'll need more than a hydration backpack. I've found that 10-15L is a reasonable compromise on capacity and weight. These packs will carry 2-3L of fluid, plus extra food and clothing in case conditions change. I tested a number of packs with a standard load of a 2L bladder, two ensure drinks, a light, waterproof top, thermal top, hat, gloves, clif bar, and six GUs. The contents end up weighing 120oz/3.4Kg/7.5Lb, which is more than I'd like, and a challenge for a running pack. I've been using the Nathan Synergy Pack for some years, and its shortcomings have led me to evaluate a range of running packs. I've ranked them roughly in priority order, with the Synergy pack at the end as a reference. |
| − | ==Ultimate Direction | + | ==Ultimate Direction Adventure Vest 4.0 (Top pick)== |
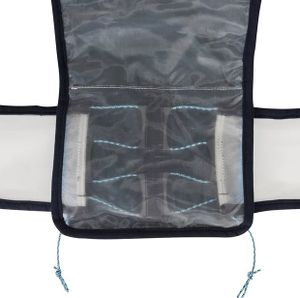
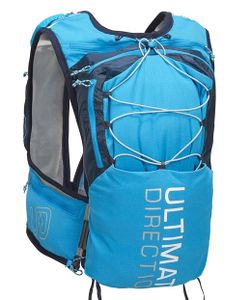
| − | This pack has a great array of features, and good capacity. | + | This update to the [[Ultimate Direction Hardrocker]] pack has a great array of features, and good capacity. <jfs id=" B07573PRKS" nonl="true" noreferb="true" n=" Ultimate Direction Adventure Vest 4.0"/>. Like its predecessor, it carried my standard load with ease, and while it took some effort to cinch things down, the results were worth the effort, and the pack has good control of the load, with minimal pendulum motion or bounce. It's a pack that can certainly carry more than I intend, but at that load the weight tends to make running quite a bit harder. However, if you doing a [[Self Supported Runs| self-supported run]] in a dodgy weather, and you want to be prepared for minor emergencies, then the extra capacity is great. There is loads of attachments and pockets to keep things organized. One of the few negative changes I found with this update is there is only one collapsible water bottle on the shoulder straps. These collapsible bottles help to balance out the weight in the main compartment nicely. The ability to shorten the shoulder straps a little help tweak the fit, though adjustment is a little tricky, and can't be done with the pack on. The main downside to this adjustment mechanism is that the hard plastic buckles can chafe quite badly. I had to put some foam padding in that section of the pack to prevent problems. |
| − | * 13. | + | * 13.1oz in weight (claimed 14.1oz), with a claimed 16.4L capacity. It's a similar size to my Synergy or Hardrocker, with room to spare when loaded with my standard gear. |
| − | * The pack is made of moderately harsh and abrasive material, but the edges are reasonably soft. | + | * The pack is made of moderately harsh and abrasive material, but the edges are reasonably soft. Watch for the hard, plastic buckles that rest against the small of your back. |
| − | * The back of the pack is a transparent mesh, which might improve breathability. | + | * The back of the pack is a transparent mesh, which might improve breathability in theory, but didn't help much in practice. |
| − | * It does not come with a hydration bladder, but there's a sleeve that UD says holds 2L and held my bladder with ease. | + | * It does not come with a hydration bladder, but there's a sleeve that UD says holds 2L and held my bladder with ease. Access to the hydration bladder is a separate zipper, which makes refilling easier. The transparent back makes it easier to check how full the bladder is without removing it from the pack. |
| − | * There's a stretch pocket of the back of the pack, and a bungee cord over the top. The bungee cord cinches down the pack if it's not full (clip the bungee to the top of the pack for best results.) There are hooks for the bungee further back that allows for better compression with partial loads. | + | * There's a stretch pocket of the bottom of the back of the pack, and a bungee cord over the top of the back of the back. The bungee cord cinches down the pack if it's not full (clip the bungee to the top of the pack for best results.) There are hooks for the bungee further back that allows for better compression with partial loads. Not having the bungee cord go the full length of the back of the pack is a bit of a negative, as you can't cinch down the lower load effectively. (The original Hardrocker was better here.) |
| − | * | + | * There are lots of pockets. |
| − | * | + | ** There are two zippered pockets on the "hip belt" near the small of your back. These will hold gloves or a small hat, or a number of gels. The right-hand pocket also has another open pocket behind it. |
| − | * | + | ** On the right-hand strap, where the shoulder strap turns into the hip belt, there's a small zippered pocket with a stretchy fabric. This will just about hold a standard sized iPhone without a case. |
| − | * The pack includes | + | ** On the left-hand strap, where the shoulder strap turns into the hip belt, there's a small open pocket with a stretchy fabric. You can put the larger sized iPhone in this pocket, but it's not very secure, and it impinges on the pocket above. |
| − | * There are two sternum straps to spread the load. The four ends of the straps slide up and down easily over a wide range. | + | ** On the right-hand shoulder strap, there's a pocket that holds the collapsible water bottle. It has a couple of pouches running around the pocket that will hold a number of gels each. |
| − | + | ** On each shoulder strap, about where your sternum is, there's a small zippered pocket made of stretchy material that would hold a few gels. Be careful putting anything hard in here as it could dig in. | |
| + | ** On the left-hand shoulder strap there's a fairly large zippered pocket that will hold a large sized iPhone with ease and have room to spare. The positioning of this pocket means that it doesn't tend to dig in, something that can be an issue with something is large hard is a cell phone. | ||
| + | * The pack includes one 500ml collapsible bottle (mini-bladders) that fit with the pack nicely. The included soft bottle work well, and you can squeeze them to get more drink out quickly. | ||
| + | * There are two sternum straps to spread the load. The four ends of the straps slide up and down easily over a wide range. The lower sternum strap is a stretchy, a simple change which really improves comfort and load control. | ||
* There's no attachment for a hydration hose, though there are loops on the shoulder straps. | * There's no attachment for a hydration hose, though there are loops on the shoulder straps. | ||
| − | * There's a small | + | * There's a small color matched blue whistle, which I wish it was a brighter color, but is a great touch. |
| − | * There are no side straps to pull the pack in closer to the shoulder straps, but the ends of the shoulder straps have a length adjustment at the bottom of the pack. This | + | * There are no side straps to pull the pack in closer to the shoulder straps, but the ends of the shoulder straps have a length adjustment at the bottom of the pack. This was a unique feature of the Hardrocker pack, but UD now include this on most of their packs. Note that the plastic on the adjustment can rub against your back, and I had to install a square of closed cell foam (from a cheap sleep mat) to prevent skin abrasion. |
| − | * The thermal top, rain coat, light, hat, gloves, and bladder went in the main compartment with ample room to spare. I put | + | * The thermal top, rain coat, light, hat, gloves, ensure, and bladder went in the main compartment with ample room to spare. I put the GUs in the smaller front pockets. I still had plenty of pockets empty, which is really nice. |
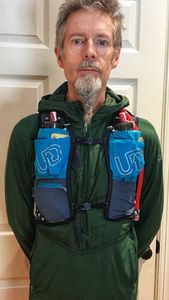
| − | * I got the | + | * I got the small, which should be 23 - 32 inches, but it fitted my 36 -inch chest nicely. |
| − | * The pack sits fairly low on the back | + | * The pack sits fairly low on the back and isn't as stable as some smaller packs. The Patagonia Fore Runner is a similar size, but more stable. I struggled to get it adjusted quite right, and there was still a bit of pendulum movement, but not too much bounce. |
| − | |||
<gallery widths=300px heights=300px class="center"> | <gallery widths=300px heights=300px class="center"> | ||
| − | File: | + | File:Ultimate Direction Adventure Vest (3).jpg |
| − | File: | + | File:Ultimate Direction Adventure Vest (2).jpg |
| − | File: | + | File:Ultimate Direction Adventure Vest (1).jpg |
| − | File: | + | File:Ultimate Direction Adventure Vest-adjust.jpg |
| + | File:Ultimate Direction Adventure Vest-front.jpg | ||
| + | File:Ultimate Direction Adventure Vest-back.jpg | ||
</gallery> | </gallery> | ||
| − | ==Ultimate Direction | + | ==Ultimate Direction Mountain Vest 4.0 (Highly Recommended)== |
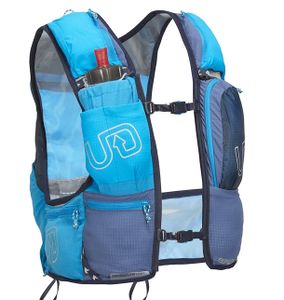
| − | This pack came very close to being my top pick, having good capacity and great load control. It's a nicely foldout pack, with plenty of features. The larger zippered pocket on the shoulder strap and the plethora of other convenient pockets means you're less likely to have to take this pack off when running. In the end, the only thing that let this pack down is its capacity isn't quite big enough for a self-supported day run. It's close, especially if you can hang some stuff off the bungee at the back, but there's not quite the margin that I think you'll need. On the other hand, if you're doing your runs in warmer conditions, doing shorter runs, or are prepared to take larger (potentially life-threatening) risks, then this pack should be on your list. | + | This update to the [[Ultimate Direction PB Adventure Vest]], and like its predecessor, it's highly recommended. <jfs id="B07572T2LS" nonl="true" noreferb="true" n=" Ultimate Direction Mountain Vest 4.0"/>. |
| − | * | + | This pack came very close to being my top pick, having good capacity and great load control. It's a nicely foldout pack, with plenty of features. The larger zippered pocket on the shoulder strap and the plethora of other convenient pockets means you're less likely to have to take this pack off when running. In the end, the only thing that let this pack down is its capacity isn't quite big enough for a [[Self Supported Runs| self-supported day run]]. It's close, especially if you can hang some stuff off the bungee at the back, but there's not quite the margin that I think you'll need. On the other hand, if you're doing your runs in warmer conditions, doing shorter runs, or are prepared to take larger (potentially life-threatening) risks, then this pack should be on your list. |
| − | * The pack is made of moderately harsh and abrasive fabric, but the edging is nice and soft. | + | * 13.9oz in weight (12.7oz claimed), with a claimed 13.3L capacity. It held my standard gear, but there was not a lot of spare rooms, so I think 16L is overstating things, and it's smaller than Patagonia's 10L pack. |
| − | * The back of the pack is a transparent mesh, which might improve breathability. | + | * The pack is made of moderately harsh and abrasive fabric, but the edging is nice and soft. Watch for the hard, plastic buckles that rest against the small of your back. |
| − | * It does not come with a hydration bladder, but there's a sleeve that UD says holds | + | * The back of the pack is a transparent mesh, which might improve breathability in theory, but didn't in practice. (At least, not if you have a plastic hydration bladder just behind the mesh.) |
| − | * The main zippered compartment held my rain jacket | + | * It does not come with a hydration bladder, but there's a sleeve that UD says holds 2L and held my bladder with ease. Access to the hydration bladder is a separate zipper, which makes refilling easier. The transparent back makes it easier to check how full the bladder is without removing it from the pack. |
| − | * There's a stretch pocket | + | * The main zippered compartment held most of my gear, but my rain jacket had to be tied to the bungie cord. |
| − | * | + | * There's a stretch pocket over the full length of the back of the pack, and a bungee cord over that. The bungee cord cinches down the pack if it's not full, keeping the load staple. The bungee cord will cinch further around the pack to stabilize smaller loads. |
| + | * There are lots of storage pockets. | ||
| + | ** There are two zippered pockets on the "hip belt" near the small of your back. These will hold gloves or a small hat, or a number of gels. There's just room for a standard sized iPhone without a case. | ||
| + | ** On the right-hand strap, where the shoulder strap turns into the hip belt, there's a small zippered pocket with a stretchy fabric. This will just about hold a standard sized iPhone without a case. | ||
| + | ** On the left-hand strap, where the shoulder strap turns into the hip belt, there's a small open pocket with a stretchy fabric. You can put the larger sized iPhone in this pocket, but it's not very secure, and it impinges on the pocket above. | ||
| + | ** On the both shoulder straps, just above the water bottle pockets there are small Velcro closing pockets that are big enough for one or maybe 2 gels. Each pocket has a slightly different closing mechanism, the way couldn't say if one is better than the other. | ||
* I like the extra small bungee loops for attaching things to. | * I like the extra small bungee loops for attaching things to. | ||
| − | * There's an | + | * There's an internal zippered pocket with a clip for keys, a good place for valuables. |
| − | + | * There are two sternum straps to spread the load. The four ends of the straps slide up and down easily over a wide range. The lower strap is a stretchy, which improves the comfort and control of the load more than you might expect. | |
| − | + | * There's no clip for a hydration hose, though there are loops on the shoulder straps. | |
| − | * There are two sternum straps to spread the load. The four ends of the straps slide up and down easily over a wide range. | + | * There's a small blue whistle, which I wish it was a brighter color. |
| − | * There's no | ||
| − | * There's a small | ||
* There are no side straps to pull the pack in closer, which I think would have helped this pack. | * There are no side straps to pull the pack in closer, which I think would have helped this pack. | ||
| − | * | + | * There's no accessible storage for a larger iPhone plus except the open pocket that's not very secure. |
| − | * I got the | + | * I got the small, which should be 23 - 32 inches, but it fits my 36 -inch chest nicely. |
| − | |||
<gallery widths=300px heights=300px class="center"> | <gallery widths=300px heights=300px class="center"> | ||
| − | File: | + | File:Ultimate Direction Mountain Vest (3).jpg |
| − | File: | + | File:Ultimate Direction Mountain Vest (2).jpg |
| − | File: | + | File:Ultimate Direction Mountain Vest (1).jpg |
| + | File:Ultimate Direction Mountain Vest-back.jpg | ||
| + | File:Ultimate Direction Mountain Vest-front.jpg | ||
| + | File:Ultimate Direction Mountain Vest-adjust.jpg | ||
</gallery> | </gallery> | ||
==Patagonia Fore Runner 10L (recommended)== | ==Patagonia Fore Runner 10L (recommended)== | ||
| Line 161: | Line 170: | ||
</gallery> | </gallery> | ||
==Ultimate Direction AK Mountain Vest (recommended)== | ==Ultimate Direction AK Mountain Vest (recommended)== | ||
| − | This is a wonderful pack, but it's on the small size for a self-supported day run. It's quite a bit smaller than the UD PB adventure vest, and a lot smaller than Patagonia's Fore Runner. It handled my standard load, but there was little room to spare. On the other hand, it was wonderfully stable, and if you can manage with its size, then it's a great pack. | + | This is a wonderful pack, but it's on the small size for a [[Self Supported Runs| self-supported day run]]. It's quite a bit smaller than the UD PB adventure vest, and a lot smaller than Patagonia's Fore Runner. It handled my standard load, but there was little room to spare. On the other hand, it was wonderfully stable, and if you can manage with its size, then it's a great pack. |
* 12.7oz (with empty bottles) in weight (7.1oz claimed), with a claimed 11.5L capacity, but it seems much smaller. I managed to get the bladder, rain top, thermal top, and light in the main compartment, with hat in one hip pocket and gloves in another. | * 12.7oz (with empty bottles) in weight (7.1oz claimed), with a claimed 11.5L capacity, but it seems much smaller. I managed to get the bladder, rain top, thermal top, and light in the main compartment, with hat in one hip pocket and gloves in another. | ||
* It does not come with a hydration bladder, but there's a sleeve that UD says holds 2L and held my bladder with ease. | * It does not come with a hydration bladder, but there's a sleeve that UD says holds 2L and held my bladder with ease. | ||
| Line 269: | Line 278: | ||
File:Packs31.jpg | File:Packs31.jpg | ||
</gallery> | </gallery> | ||
| + | =Hydration Bladders= | ||
| + | I've tried a variety of hydration bladders over the years, and I've recently discovered the Geigerrig pressurized hydration bladder, which is rapidly become my favorite. I've been greatly surprised by how much better I hydrate with a pressurized bladder. While it doesn't seem like that much effort to suck the fluid from an unpressurized system, the additional effort results in less fluid delivery in a given time (you drink more slowly.) Because you can't breathe and drink at the same time, this slow delivery while running makes hydration quite a lot harder. The other advantage of a pressurized system is that the bladder stays a fairly constant size, something I prefer as it keeps the hydration pack a little more stable. | ||
| + | ==Geigerrig Pressurized Hydration Engine== | ||
| + | The Geigerrig system appears to be patented, and includes 2 separate chambers, one for your drink, and the other for the pressurized air. This means that assuming you squeeze all the air out of the fluid chamber, you never get a frothy mixture. This system also completely separates the drink and air tubes, so there's no problem with stocking up on a carbohydrate rich drink, as it won't clog up the pressurization components. This approach is not without its caveats, and in fact, there's actually quite a long list of minor problems… | ||
| + | * The most obvious issue is the price, as the Geigerrig retails for around $50 in the US. <jfs id=" B005FVMUHU" noreferb="true" nonl="true" n="Geigerrig Pressurized Hydration Engine"/> | ||
| + | * Strangely, the capacity is a little smaller than advertised. I found that the 2-liter held about 1.8 liters and the 3-liter held about 2.8 liters. | ||
| + | * Because the Geigerrig doesn't have any interior baffles, the drink sloshes around quite a bit. You effectively have two bladders placed back to back, so the fluid sloshes against the pressurized air. This never caused me a problem, but it was a little noisy. It's actually a little bit more slosh than you would get from an unpressurized and unbaffled bladder. | ||
| + | * This is a pressurized system that relies on manual inflation, so you need to have the inflation bulb accessible to add more air during the run. This can be an issue depending how fully loaded your pack is and how it's designed. With the Hardrocker, I could easily and conveniently locate it in one of the shoulder pockets, but that takes up valuable real estate. When I'm carrying more gear, I tend to place it in the outer mesh pockets at the very back, and I can just about reach over my shoulder to add more air on the run. | ||
| + | * Some runners have found the on/off valve for the drinking tube to be a little awkward, but I haven't had any issue. Just grab the end and do a "lefty-loosey righty-tighty" twist. | ||
| + | * My first Geigerrig bladder started leaking badly on my second run with it. Luckily, the leak was in the pressurization system, so I could still use it as a normal, unpressurized bladder. I've not heard any reports of this being a widespread problem, and they offer a lifetime warranty, so I'm working on the basis that I was just extremely unlucky. | ||
| + | * The final problem is that you have a hose connection point on the front and the back of the bladder. Many hydration packs placed the bladder close to your back, so these hose connection points can easily rub. I found I needed to arrange the bladder with the pressurization connector facing away from my back, and the drinking connector facing towards the small of my back. I'd already put a small piece of closed cell foam over my Hardrocker pack (see above), so this lower connector didn't rub. | ||
| + | The key takeaway from this long list of minor problems is that they are all fairly minor. Having used a pressurized hydration bladder, it would be really hard to go back to an unpressurized system. The reduction in drinking effort makes it far more likely that I will stay appropriately hydrated, and I wish I'd had access to this system long ago. | ||
| + | [[File:Geigerrig Pressurized Hydration Engine.jpg|center|thumb|300px|]] | ||
| + | ==Watertite Pressurized Hydration Bladder == | ||
| + | Having fallen in love with the Geigerrig system above, I was curious if I could get all the advantages for half the price. (<jfs id="B01DT03JEG" noreferb="true" nl="false" nonl="true" n="Watertite at Amazon"/>.) Since the good news is that this system is indeed a pressurized hydration bladder, and it is well under half the price of the Geigerrig system. Unfortunately, this bladder should only be used with water, not sports drink. For me this was a deal-breaker, as I rarely if ever carry just plain water. The reason for the "water only" mandate is that the pressurization bulb is on the same hose that you drink from, so any fluid is going to get into the pressurization system and clog it up. A second reason for "water only" is that the Watertite bladder doesn't have a separate department for the pressurized air, and a sloshing effect will cause the drink and air to mix up and make a froth. This isn't too much of a problem with plain water, but a sports drink will result in quite a bit of frothiness, and the drinking that frothy mixture can cause digestive discomfort. I'm also a little concerned that the pressurization might cause a leak, and with a single compartment system you to lose all of your drink, whereas this a reasonable chance that a similar leak in the Geigerrig system would leave you with a viable if unpressurized bladder. | ||
| + | ==Non-pressurized bladders== | ||
| + | I've not found one non-pressurized bladder significantly better than another. I've got on well with most of the name brands, including Camelbak, Platypus, Nathan, and Ultimate Direction. Before the Geirerrig, I'd settled on using the <jfs n="3L Camelbak Crux" id="B01LA5FCJ2" nonl=true noreferb="true"/>) as I like it being slightly wider at the top than the bottom to move the fully loaded weight slightly higher up, and I find the plastic handle around the opening makes it easier to fill up. The bite valve works okay and the on-off switch is pretty good. However, it's all slight advantages over similar bladders, and using the bladder that comes with your pack helps ensure you have a good fit. | ||
=Storing Bladders= | =Storing Bladders= | ||
It's easy to get mold in a hydration bladder, and once that happens the best option is often to replace it. Rinsing with dilute bleach works for some people, but it often leaves an aftertaste. Rinsing and drying the bladder, then putting it in the freezer will prevent mold growing. If you rinse with rubbing alcohol, the bladder should dry more quickly. Use Ethyl Alcohol, not the toxic Isopropyl and remember the fumes are flammable. | It's easy to get mold in a hydration bladder, and once that happens the best option is often to replace it. Rinsing with dilute bleach works for some people, but it often leaves an aftertaste. Rinsing and drying the bladder, then putting it in the freezer will prevent mold growing. If you rinse with rubbing alcohol, the bladder should dry more quickly. Use Ethyl Alcohol, not the toxic Isopropyl and remember the fumes are flammable. | ||
[[File:StoringBlad.JPG|none|thumb|500px|To prevent mold, it's best to store hydration bladders and hoses in the freezer.]] | [[File:StoringBlad.JPG|none|thumb|500px|To prevent mold, it's best to store hydration bladders and hoses in the freezer.]] | ||
Latest revision as of 14:23, 23 August 2018
Correct hydration is of vital importance, and sometimes it is necessary to carry your drinks while running. Remember to drink based on your thirst, as over hydration is dangerous and can be fatal, while dehydration is far less of an issue than most people believe. Carrying fluids is always inconvenient, so choosing a hydration system is a matter of finding the least bad approach. There are several options open to you:
- Handheld bottle. Because the bottle is in your hand, you don't have problems with it jostling, rubbing, or banging against you. However, the bottle occupies one (or both) of your hands and can tire your arms. In some situations, it can also change your biomechanics and running form.
- Waist pack. Putting your fluids around your waist frees up your hands and moves the weight onto your body. You can carry more fluid in this position than in a handheld bottle. Unfortunately, waist packs either put pressure on to your abdomen, which causes digestive problems, or it puts pressure on to your hips, causing the problems in the muscles of your hips and legs. Waist packs are particularly problematic for the ITB, as they put pressure on the activating muscle (TFL).
- Back pack. Using a back pack allows for the greatest quantity of fluid and keeps the weight on your shoulders and back which are stronger than your arms or abdomen. The downside to a backpack is that they tend to bounce and chafe while running.
- Cheating. The ideal option if you can manage it is to cache or buy drinks along your running route so you don't need to carry it.
Contents
- 1 Handheld Bottles
- 2 Hydration Waist Packs
- 3 Hydration Backpacks
- 4 Running Packs
- 4.1 Ultimate Direction Adventure Vest 4.0 (Top pick)
- 4.2 Ultimate Direction Mountain Vest 4.0 (Highly Recommended)
- 4.3 Patagonia Fore Runner 10L (recommended)
- 4.4 Ultimate Direction AK Mountain Vest (recommended)
- 4.5 Nathan VaporKrar
- 4.6 Ultimate Direction Jurek FKT
- 4.7 Salomon Skin Pro 15
- 4.8 Nathan Synergy Pack
- 5 Hydration Bladders
- 6 Storing Bladders
1 Handheld Bottles
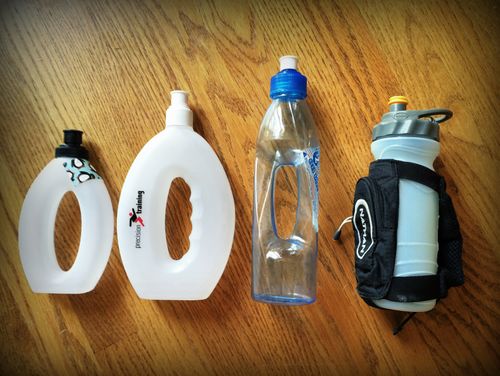
The most common approach to handheld running bottles is a simple strap around a bottle designed for cycling or other purposes. The classic example is theNathan Quickdraw, which includes a pocket in the strap for a phone, gels, etc. While these bottles work they put a lot of twisting stress on your forearms and are a poor solution to the problem. The best bottles are the ones that allow your hand to go through the middle, as these are far more relaxing to hold. These oval running bottles are common in Europe, but seem to be hard to find in the US. However, they are starting to become available as the precision trainingandHydrogrip.
1.1 Salomon Hydration Gloves
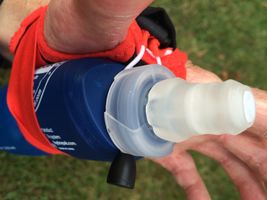
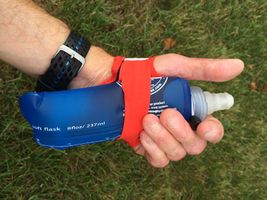
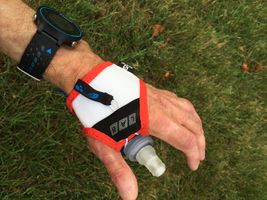
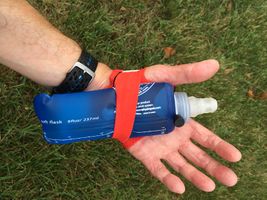
Salomon has a novel approach using a small hydration bladder that fits in a partial glove. They call this the "Salomon Sense Hydro S-Lab Handheld Hydration Set". This is a novel solution that at least partly works. It is reasonably relaxing to hold, but it only holds 8 fluid ounces/200 mL and is rather pricy for what it is.
- Salomon Sense Hydro S-Lab Handheld Hydration Set
2 Hydration Waist Packs
I have never found a waist pack that I get on with, and find they always cause either abdominal/digestive problems, or issues with the hip muscles. However, I know many runners get on well with thefuel belt system, typically for the marathon distance training runs. These small bottles distribute the weight better than systems that use one or two standard sized water bottles.
3 Hydration Backpacks
When we need more fluid than I can carry in a single handheld bottle, I swap to a hydration backpack. None of the backpacks I have tried avoid the problem of bouncing and chasing completely, but there are two that stand out as better than the others that I have tried, and two more that are worthy of consideration. (See below for more details.)
- Best Value. The Nathan HPL 020 Vesthas been around for quite a while, and thankfully Nathan has not messed with a winning design. This 14oz pack holds 2 L along with various pockets for bits and pieces. Its adjustments hold the pack in place better than others I've tried, and it has minimal jostling. The HPL 020 is also a cheaper pack with an MSRP of $100 and can often be found for $80 or less.
- Minimalist. The UltrAspire Alpha Vestis a far more minimalist hydration pack, weighing less than Nathan, but achieving good levels of control. The Alpha is lightweight (12oz), which makes it a little smaller than many packs, and it does not have quite so much storage space which prevents you from loading yourself down. With an MSRP of $115, the Alpha is reasonable value for money.
- The Heavyweight. The Salomon Skin Pro 14+3a larger pack, which is a mixed blessing. There are times when it's useful to be able to carry more gear, but the size of this pack does tend to encourage overloading. The MSRP is $160, so it's a little more expensive than the Nathan or the Alpha. If you need a small, lightweight (15oz) day pack in this is well worth considering.
- The maximalist. The Nathan Vapor Cloudis a heavier pack at 19oz, even though it only holds 11 Liters of gear, quite a bit less than the lighter Salomon. With an MSRP of $200 it's rather pricey for a hydration pack, but it does have some nice features. If you're not worried too much about weight or cost, then it's worth thinking about.
3.1 Nathan HPL 020 Vest
The Nathan HPL 020 Vestis a little older in its design, and is something of a classic. The 020 is also one of the cheaper packs on the market, making it good value for money.
- The design and features are rather minimalist and quite simple, which makes it much less likely you'll end up faxing around with confusing straps or forgotten pockets.
- There is a single main pocket to hold the bladder and a little bit of extra gear, with a small zippered pocket behind that for gloves, socks, etc.
- The right shoulder strap has an open topped pocket with a bungee fastener, and the left shoulder strap has a separate pocket with a tiny pouch in front of that.
- The shoulder straps are pulled together with a single clip. Earlier versions of the pack had a Velcro closure which I thought worked much better.
- The pack volume is just less than 5 liters, so you can carry about 3 liters of gear with the 2 liter bladder, and it weighs 14 oz with an empty bladder.
- Like virtually all hydration packs that are some bungee cords to tie extra clothes to the pack, and again the Nathan is a little more minimalist than most, making it a little trickier to tie stuff on.
- This pack only comes in a single size.
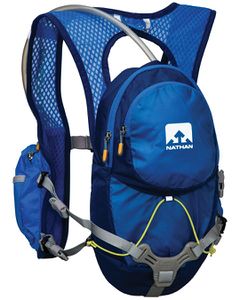 Back view of theNathan HPL 020 Vest |
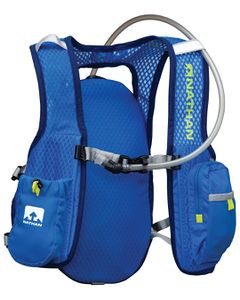 Front view of theNathan HPL 020 Vest |
3.2 UltrAspire Alpha Vest
The UltrAspire Alpha Vestis a far more minimalist hydration pack, weighing less than Nathan, but achieving good levels of control.
- There is an open topped pouch forming the main body of the pack that holds the bladder, with a small Velcro tab to hold the top of the bladder in place.
- There are some useful bungee straps on the back of the pack to hold extra gear, and in the bungee cord clips onto the top of the pack to help hold things together, something which I found a little fiddly.
- At the base of the main pack there is a small pocket that is held closed by magnets and accessible from either side. This is a great piece of design that allows you to access gear stored in the main area without taking the pack off.
- The chest straps have a good sized mesh pocket on either side with a bungee closure, and each pocket would holds about 6 gels or similar. At the top of the right strap is a small pocket with a magnetic fastener, but this is rather small and would not fit a single gel, though you could probably put the keys. The left side has a similar sized mesh pocket with a zipper.
- I found the connectors for the chest straps a little fiddly, but they work once you get used to them.
- I do not like the mouthpiece of the bladder that comes with the Alpha, but it's easy to use an alternative.
- This pack comes in two sizes, and at 140 pounds the small size worked well for me.
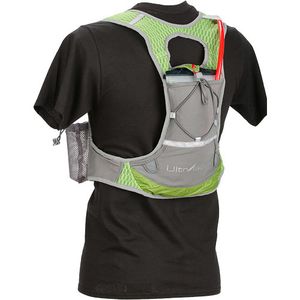 Back view of theUltrAspire Alpha Vest |
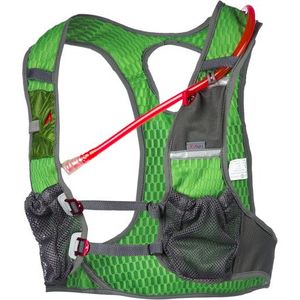 Front view of theUltrAspire Alpha Vest. |
3.3 Salomon Skin Pro 14+3
The Salomon Skin Pro 14+3is larger and more complex than most packs, and is the opposite of the Alpha. In some ways you can think of this pack as a very small, lightweight day pack, rather than as a typical hydration pack. The pack also tends to be a little more complex than I would like, with a wide array of pockets straps and fasteners. However, there are situations where you do need a pack that will carry more gear, like Hard Rock 100where there are several hours between aid station cut off times. I don't think this is an ideal pack for running with, but it doesn't make a great ultralight day pack for hiking.
- The main body of the pack as a number of features:
- The bladder sits in its own sleeve that can be accessed independently from the other pockets.
- The main pocket is large enough for a thick fleece and is accessed by a zipper that goes over the top and down both sides, using two zips for flexibility.
- Behind the main pocket is a full-length thinner pocket that is accessed by a full-length zipper down one side.
- Either side of the main pack there are open holders that would accept a water bottle.
- The back of the pack is attached to straps going down the shoulder straps that allow the contents to be compressed in place, making it a little easier to carry the pack when it is partly loaded.
- The pack has some attachments for holding hiking poles though this is a rather more complex than I would like.
- Each shoulder strap has a reasonably large pocket that would contain a small bottle and is fastened with a bungee. The left pocket has a small mesh pocket attached that holds a gel.
- The closure for the shoulder straps uses a clip-on fastener with quite a bit of placement flexibility.
- The package includes an emergency whistle, which is a great idea.
- As the name suggests, this pack holds 17 Liters of gear and weighs a remarkably light 15oz.
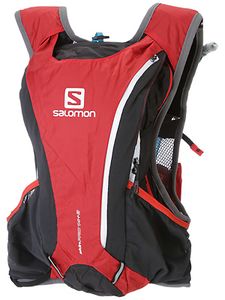 Back view of theSalomon Skin Pro 14+3. |
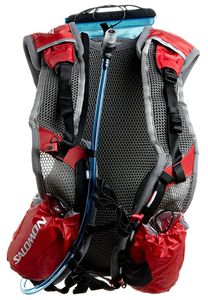 Front view of theSalomon Skin Pro 14+3. |
3.4 Nathan Vapor Cloud
The Nathan Vapor Cloudis nice pack, and the materials that are used are nicer than the other packs I have recommended here. However these materials have both a financial and a weight cost.
- The main body of the pack is accessed via an open elasticated gap at the top. The hydration bladder sits in its own sleeve next to your back, and is held in place by a simple Velcro tab.
- There are also two full length zippered pockets on the back one with a horizontal zipper and the other with a vertical zipper.
- There is a third full-length pocket that is on the inside of the back of the pack, which Nathan suggest is for an ice pack, which is a nice idea but would be rather uncomfortable.
- There are some internal straps intended to compress the hydration bladder and prevent it sloshing around when it's partially empty.
- There is a good length of bungee cord across the back for time on extra gear.
- Each of the hip belts contains a zippered pocket that would hold a few gels.
- Each shoulder strap has an open pocket with a bungee closer that would hold several gels, but not a waterfall.
- The right shoulder strap is a tiny pocket with a Velcro closure. Nathan suggests this pocket is for pills.
- The hydration tube has a magnetic clip to attach it to the shoulder straps, which is a nice idea.
- The shoulder straps are clipped together with the usual buckles.
- The package includes an emergency whistle, which is a great idea.
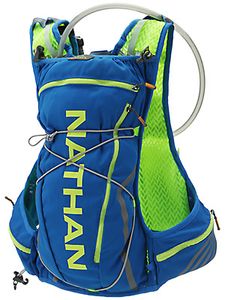 Back view of theNathan Vapor Cloud. |
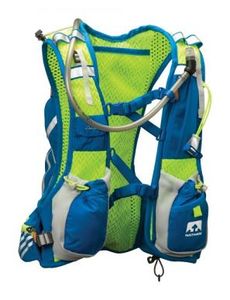 Front view of theNathan Vapor Cloud. |
4 Running Packs
If you need to run all day self-supported, you'll need more than a hydration backpack. I've found that 10-15L is a reasonable compromise on capacity and weight. These packs will carry 2-3L of fluid, plus extra food and clothing in case conditions change. I tested a number of packs with a standard load of a 2L bladder, two ensure drinks, a light, waterproof top, thermal top, hat, gloves, clif bar, and six GUs. The contents end up weighing 120oz/3.4Kg/7.5Lb, which is more than I'd like, and a challenge for a running pack. I've been using the Nathan Synergy Pack for some years, and its shortcomings have led me to evaluate a range of running packs. I've ranked them roughly in priority order, with the Synergy pack at the end as a reference.
4.1 Ultimate Direction Adventure Vest 4.0 (Top pick)
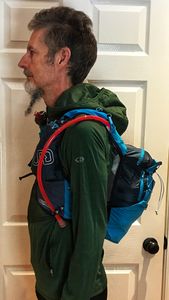
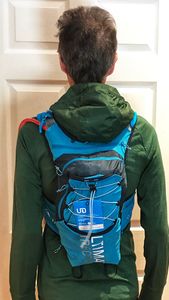
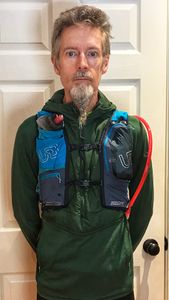
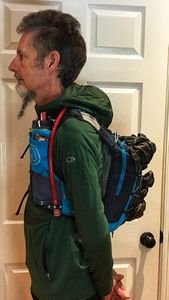
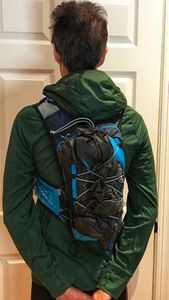
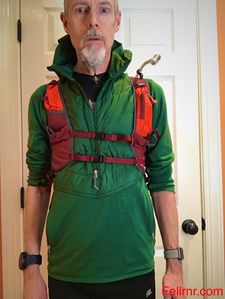
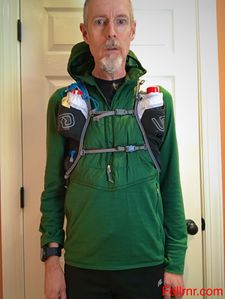
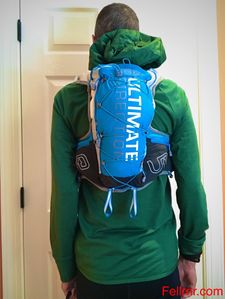
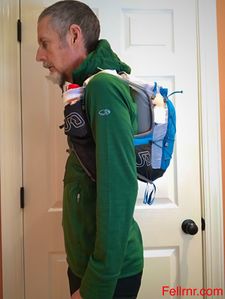
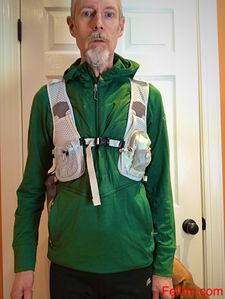
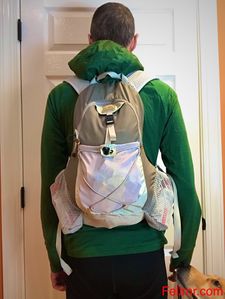
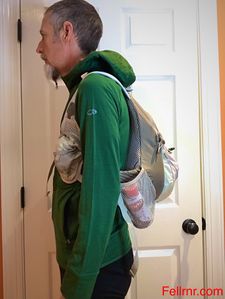
This update to the Ultimate Direction Hardrocker pack has a great array of features, and good capacity. Error: Could not parse data from Amazon!. Like its predecessor, it carried my standard load with ease, and while it took some effort to cinch things down, the results were worth the effort, and the pack has good control of the load, with minimal pendulum motion or bounce. It's a pack that can certainly carry more than I intend, but at that load the weight tends to make running quite a bit harder. However, if you doing a self-supported run in a dodgy weather, and you want to be prepared for minor emergencies, then the extra capacity is great. There is loads of attachments and pockets to keep things organized. One of the few negative changes I found with this update is there is only one collapsible water bottle on the shoulder straps. These collapsible bottles help to balance out the weight in the main compartment nicely. The ability to shorten the shoulder straps a little help tweak the fit, though adjustment is a little tricky, and can't be done with the pack on. The main downside to this adjustment mechanism is that the hard plastic buckles can chafe quite badly. I had to put some foam padding in that section of the pack to prevent problems.
- 13.1oz in weight (claimed 14.1oz), with a claimed 16.4L capacity. It's a similar size to my Synergy or Hardrocker, with room to spare when loaded with my standard gear.
- The pack is made of moderately harsh and abrasive material, but the edges are reasonably soft. Watch for the hard, plastic buckles that rest against the small of your back.
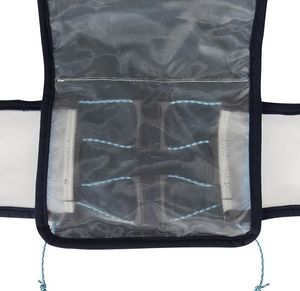
- The back of the pack is a transparent mesh, which might improve breathability in theory, but didn't help much in practice.
- It does not come with a hydration bladder, but there's a sleeve that UD says holds 2L and held my bladder with ease. Access to the hydration bladder is a separate zipper, which makes refilling easier. The transparent back makes it easier to check how full the bladder is without removing it from the pack.
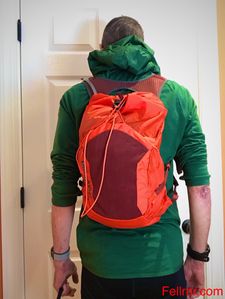
- There's a stretch pocket of the bottom of the back of the pack, and a bungee cord over the top of the back of the back. The bungee cord cinches down the pack if it's not full (clip the bungee to the top of the pack for best results.) There are hooks for the bungee further back that allows for better compression with partial loads. Not having the bungee cord go the full length of the back of the pack is a bit of a negative, as you can't cinch down the lower load effectively. (The original Hardrocker was better here.)
- There are lots of pockets.
- There are two zippered pockets on the "hip belt" near the small of your back. These will hold gloves or a small hat, or a number of gels. The right-hand pocket also has another open pocket behind it.
- On the right-hand strap, where the shoulder strap turns into the hip belt, there's a small zippered pocket with a stretchy fabric. This will just about hold a standard sized iPhone without a case.
- On the left-hand strap, where the shoulder strap turns into the hip belt, there's a small open pocket with a stretchy fabric. You can put the larger sized iPhone in this pocket, but it's not very secure, and it impinges on the pocket above.
- On the right-hand shoulder strap, there's a pocket that holds the collapsible water bottle. It has a couple of pouches running around the pocket that will hold a number of gels each.
- On each shoulder strap, about where your sternum is, there's a small zippered pocket made of stretchy material that would hold a few gels. Be careful putting anything hard in here as it could dig in.
- On the left-hand shoulder strap there's a fairly large zippered pocket that will hold a large sized iPhone with ease and have room to spare. The positioning of this pocket means that it doesn't tend to dig in, something that can be an issue with something is large hard is a cell phone.
- The pack includes one 500ml collapsible bottle (mini-bladders) that fit with the pack nicely. The included soft bottle work well, and you can squeeze them to get more drink out quickly.
- There are two sternum straps to spread the load. The four ends of the straps slide up and down easily over a wide range. The lower sternum strap is a stretchy, a simple change which really improves comfort and load control.
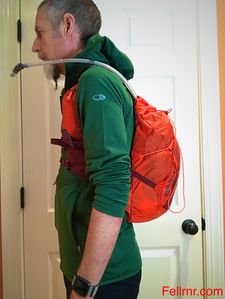
- There's no attachment for a hydration hose, though there are loops on the shoulder straps.
- There's a small color matched blue whistle, which I wish it was a brighter color, but is a great touch.
- There are no side straps to pull the pack in closer to the shoulder straps, but the ends of the shoulder straps have a length adjustment at the bottom of the pack. This was a unique feature of the Hardrocker pack, but UD now include this on most of their packs. Note that the plastic on the adjustment can rub against your back, and I had to install a square of closed cell foam (from a cheap sleep mat) to prevent skin abrasion.
- The thermal top, rain coat, light, hat, gloves, ensure, and bladder went in the main compartment with ample room to spare. I put the GUs in the smaller front pockets. I still had plenty of pockets empty, which is really nice.
- I got the small, which should be 23 - 32 inches, but it fitted my 36 -inch chest nicely.
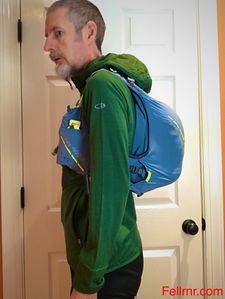
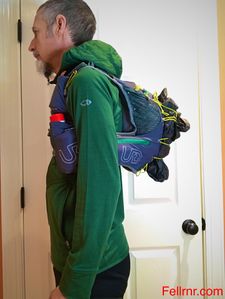
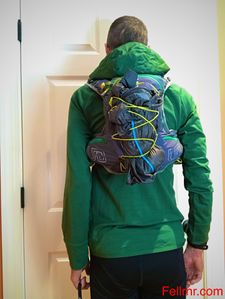
- The pack sits fairly low on the back and isn't as stable as some smaller packs. The Patagonia Fore Runner is a similar size, but more stable. I struggled to get it adjusted quite right, and there was still a bit of pendulum movement, but not too much bounce.
4.2 Ultimate Direction Mountain Vest 4.0 (Highly Recommended)
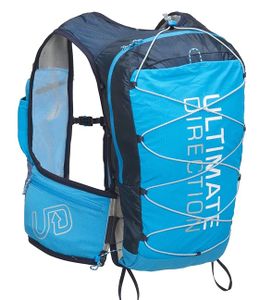
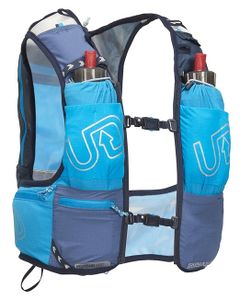
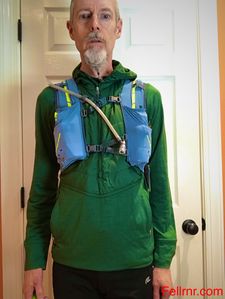
This update to the Ultimate Direction PB Adventure Vest, and like its predecessor, it's highly recommended. Error: Could not parse data from Amazon!. This pack came very close to being my top pick, having good capacity and great load control. It's a nicely foldout pack, with plenty of features. The larger zippered pocket on the shoulder strap and the plethora of other convenient pockets means you're less likely to have to take this pack off when running. In the end, the only thing that let this pack down is its capacity isn't quite big enough for a self-supported day run. It's close, especially if you can hang some stuff off the bungee at the back, but there's not quite the margin that I think you'll need. On the other hand, if you're doing your runs in warmer conditions, doing shorter runs, or are prepared to take larger (potentially life-threatening) risks, then this pack should be on your list.
- 13.9oz in weight (12.7oz claimed), with a claimed 13.3L capacity. It held my standard gear, but there was not a lot of spare rooms, so I think 16L is overstating things, and it's smaller than Patagonia's 10L pack.
- The pack is made of moderately harsh and abrasive fabric, but the edging is nice and soft. Watch for the hard, plastic buckles that rest against the small of your back.
- The back of the pack is a transparent mesh, which might improve breathability in theory, but didn't in practice. (At least, not if you have a plastic hydration bladder just behind the mesh.)
- It does not come with a hydration bladder, but there's a sleeve that UD says holds 2L and held my bladder with ease. Access to the hydration bladder is a separate zipper, which makes refilling easier. The transparent back makes it easier to check how full the bladder is without removing it from the pack.
- The main zippered compartment held most of my gear, but my rain jacket had to be tied to the bungie cord.
- There's a stretch pocket over the full length of the back of the pack, and a bungee cord over that. The bungee cord cinches down the pack if it's not full, keeping the load staple. The bungee cord will cinch further around the pack to stabilize smaller loads.
- There are lots of storage pockets.
- There are two zippered pockets on the "hip belt" near the small of your back. These will hold gloves or a small hat, or a number of gels. There's just room for a standard sized iPhone without a case.
- On the right-hand strap, where the shoulder strap turns into the hip belt, there's a small zippered pocket with a stretchy fabric. This will just about hold a standard sized iPhone without a case.
- On the left-hand strap, where the shoulder strap turns into the hip belt, there's a small open pocket with a stretchy fabric. You can put the larger sized iPhone in this pocket, but it's not very secure, and it impinges on the pocket above.
- On the both shoulder straps, just above the water bottle pockets there are small Velcro closing pockets that are big enough for one or maybe 2 gels. Each pocket has a slightly different closing mechanism, the way couldn't say if one is better than the other.
- I like the extra small bungee loops for attaching things to.
- There's an internal zippered pocket with a clip for keys, a good place for valuables.
- There are two sternum straps to spread the load. The four ends of the straps slide up and down easily over a wide range. The lower strap is a stretchy, which improves the comfort and control of the load more than you might expect.
- There's no clip for a hydration hose, though there are loops on the shoulder straps.
- There's a small blue whistle, which I wish it was a brighter color.
- There are no side straps to pull the pack in closer, which I think would have helped this pack.
- There's no accessible storage for a larger iPhone plus except the open pocket that's not very secure.
- I got the small, which should be 23 - 32 inches, but it fits my 36 -inch chest nicely.
4.3 Patagonia Fore Runner 10L (recommended)
This is the biggest surprise of my testing. The Fore Runner is a day pack with the lid removed and not much else done to make it suitable for running, other than adding some stability straps from the shoulder straps to the main pack. However, this pack is one of the most stable I've tested, clinging to my back like a loving koala bear. The pack is much bigger than you'd expect from the claimed capacity, or maybe it's just that everybody else's claimed capacity is a wild exaggeration. While this pack does of the core features really well, coupling loads of gear and carrying it comfortably. It falls short on the features that make a pack a "running pack." There's few pockets, and little gear falls at hand while you're running. This is a pack you're likely to have to take on and off fairly frequently during a run, and certainly a lot more frequently than I would like.
- 15.3oz in weight (11oz claimed), with a claimed 10L capacity. For 10L, this pack has more capacity than my Synergy, with room to spare when loaded with my standard gear.
- The pack is made of harsh and abrasive material that I would not want next to my skin.
- It has a 2L bladder, and I think it would hold a 3L bladder with ease.
- There's a stretch pocket of the back of the pack, and a compression cord cinches down the pack if it's not full. This cinching works okay, but not as well as the Hardrocker.
- There's relatively few pockets on this pack, and fewer tie down points, such as bungee loops.
- There's an internal zippered pocket with a clip for keys, a good place for valuables.
- There are two sternum straps to spread the load, but they don't move up or down. The placement seems odd, and I really wanted to be able to spread them apart. The clips are small, but easy to use, thought I'd rather have the standard backpack clips that are less fiddly.
- There's an attachment for a hydration hose high on the shoulder strap, but not on the sternum strap. I found the hydration hose tended to wave around until locked down using the bungee cord that holds the shoulder pocket closed. This makes it awkward to get to, but at least it doesn't hit you in the face.
- There's no whistle.
- An iPhone/iPhone plus will fit in the bungee closed pockets on the shoulder straps, but didn't feel secure and I wouldn't put my phone there.
- There is a single side straps to pull the pack in closer, which helps control the load.
- I got the small/medium, which should be 35-40 inches, and it fitted well. I'm not sure there's another four inches of chest capacity however.
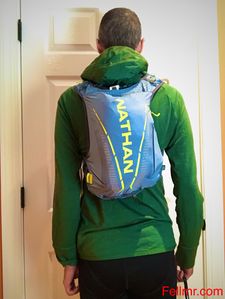
- The pack sits midway on the back, slightly lower than many running packs. I wished the sternum straps adjusted for height, but they worked well enough for the shoulder straps not to dig in. The pack was nice and stable, with little pendulum movement or bounce.
4.4 Ultimate Direction AK Mountain Vest (recommended)
This is a wonderful pack, but it's on the small size for a self-supported day run. It's quite a bit smaller than the UD PB adventure vest, and a lot smaller than Patagonia's Fore Runner. It handled my standard load, but there was little room to spare. On the other hand, it was wonderfully stable, and if you can manage with its size, then it's a great pack.
- 12.7oz (with empty bottles) in weight (7.1oz claimed), with a claimed 11.5L capacity, but it seems much smaller. I managed to get the bladder, rain top, thermal top, and light in the main compartment, with hat in one hip pocket and gloves in another.
- It does not come with a hydration bladder, but there's a sleeve that UD says holds 2L and held my bladder with ease.
- There's a stretch pocket of the back of the pack, and a bungee cord over the top. The bungee cord cinches down the pack if it's not full and I think it would handle partial loads well. There's hooks for the bungee further back that allows for better compression with smaller loads.
- There's several zippered sub-pockets over the main compartment, but they share capacity. Still, it's nice for organizing your gear for easy access.
- There are two hip pockets, both zippered. There's also a pocket that could be thought of as at the bottom of the shoulder strap or as an extra hip pocket.
- The hip pockets held my gloves on one side and hat on the other, with a bit of room to spare.
- The shoulder straps each have an open pocket for bottles, with a cinch bungee to hold them in place. There's a stretch pocket over the bottle pockets that holds a few GUs. Below the bottle pockets there's a stretch pocket on one side and a zippered pocket the other. There's also a small pocket either side that Velcro shut.
- The pack includes two 500ml collapsible bottles (mini-bladders) that fit with the pack nicely. I swapped the two bottles for Ensure bottles for my standard load. In practice, I would probably have put the contents of the ensure into one of the included bottles and some of the water from the bladder into the other, but I wanted to stick with the standard load for this test. The included soft bottles would work better, as the hard ensure bottle were slightly noticeable on the shoulder straps, digging in a little (not as much as the Hardrocker.)
- An iPhone/iPhone plus will fit in either shoulder strap stretch pocket, and the iPhone will fit in the zippered pocket at the bottom of the shoulder strap.
- There are two sternum straps to spread the load. The four ends of the straps slide up and down easily over a wide range. They have proper backpacking clips, which work well.
- There's no attachment for a hydration hose, though there are loops on the shoulder straps that might help.
- A lot of the material is see through, which makes it much easier to find stuff.
- There's no whistle.
- There are no side straps to pull the pack in closer.
- I got the small and medium sizes by mistake. The small, which should be 24-33 inches, fit reasonably well, though I was at the edge of what was comfortable. The medium, which should fit 31-40 inches seemed a little too large and I was pulling the straps to the limit of their adjustment.
- The pack sits really high up, almost between the shoulder blades. It's a stunningly stable pack, with almost no extra movement. It's more like I've put on an extra 5lb over my upper torso than I'm wearing a pack.
4.5 Nathan VaporKrar
The VaporKrar is a much lighter pack, and not really quite big enough for self-supported day length runs. It only just held my standard gear and it didn't feel secure.
- 13.8oz in weight (12oz claimed), with a claimed 12L capacity. I think this is a stretch, as it's nothing like the size of the Synergy pack.
- The pack is made of soft, silky material that's nice against the skin, but so flexible it's a little harder to pack things in as the pack just flops around.
- It comes with a 1.8L hydration bladder which fits in its own sleeve.
- The main compartment opens at the top and has a small patch of Velcro to close, which doesn't feel very secure at all. Losing gear on a self-supported run could be a disaster!
- There's a vertical opening pocket on the back that's zippered and would hold my hat and gloves, but not much more. It's strange that this is zippered but the main compartment isn't.
- There's a pass through at the small of the back, which you could put a top through for storage.
- There's no hip pockets.
- An iPhone/iPhone plus will fit in either shoulder strap stretch pocket and will be completely covered, which is not as secure as a zippered pocket, but pretty good.
- The shoulder straps have two pockets each, one Velcro, the other open.
- There are two sternum straps, each in a triangle pattern, which spreads the load. All six attachment points move up and down. The sternum clips are standard backpack clips that work well. There is a magnetic point to attach the hydration hose, but no whistle.
- There are side straps to reduce the length of the shoulder straps and pull the pack in closer, which helps stabilize things, but I found I had to tighten things more than was comfortable to prevent the pack swaying from side to side.
- There's no compression bungee to reduce the capacity for partial loads.
- The pack holds my standard gear, with most things in the main compartment, hat & gloves in the zippered rear pocket, the Ensure in the larger front pockets and the Gu in the smaller front pocket. It fits, but only just, and it doesn't feel secure.
- With my standard load, the pack feels overstuffed, with too much of the pressure on the spine rather than spread out over the back. The pack feels like it's only attached towards the top, and sways like a pendulum. Removing some of the gear helps only slightly.
- The front of the pack works much better, spreading the load over the chest without any hotspots or rubbing.
4.6 Ultimate Direction Jurek FKT
This pack is way too small, and the straps are uncomfortable, boarding on painful. I couldn't get the pack setup to avoid the discomfort.
- Only 11oz in weight, with a claimed 11.6L capacity, but it's nothing like the size of the Synergy pack.
- I couldn't get the bladder, thermal top and rain top into the zippered main compartment.
- There's a rear zippered pocket, but it shares capacity with the main compartment.
- The pack is a mix of moderately harsh and abrasive material with some softer patches, and soft edges.
- It does not come with a hydration bladder, but there's a sleeve that UD says holds 2L, but struggled with my bladder.
- There's a bungee over the back of the pack to store extra gear and to compress the pack for partial loads.
- The hip pockets held my gloves on one side and hat on the other, with a bit of room to spare.
- The shoulder straps each have an open pocket for bottles, plus a stretchy pocket that holds a few GUs. There's also a tiny Velcro pocket higher up on one side, which is about half the size of a Gu. On the other side is a zippered pocket that will swallow a Clif bar and several GUs, plus another stretchy pocket over the top.
- The pack includes two 600ml bottles that fit with the pack nicely. I swapped the two bottles for Ensure bottles for my standard load. In practice, I would probably have put the contents of the ensure into one of the included bottles and some of the water from the bladder into the other, but I wanted to stick with the standard load for this test. (I much prefer the collapsible bottles on the UD packs.)
- There are two sternum straps to spread the load. The four ends of the straps have several points they can be attached to, but this is a fiddly process of removing a tee joint and threading it back through. Not something you can adjust during a run very easily.
- There's no attachment for a hydration hose and no whistle.
- There are lots of small bungee loops to attach things.
- There are no side straps to pull the pack in closer
- The pack doesn't really hold my standard gear. The thermal top, bladder in the main compartment, light in the rear zippered pocket, hat & gloves in the zippered hip pockets, the Ensure in the front pockets and the GUs in the smaller front pockets. However, my rain coat had to be attached on the bungee cord. It fits, but only just, and it doesn't feel secure.
- The pack doesn't feel big enough the small size should fit 38 inches and my chest is 36. The straps feel too far apart and dig into my deltoid muscles and collar bone.
- The pack sites quite high up, but is fairly stable, probably because of the pressure the straps put on my shoulders.
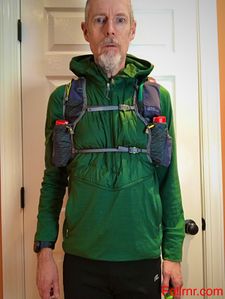
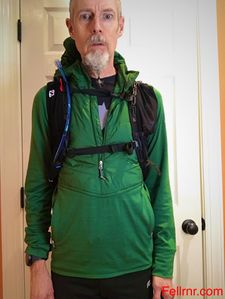
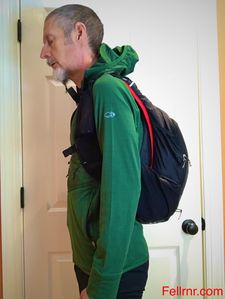
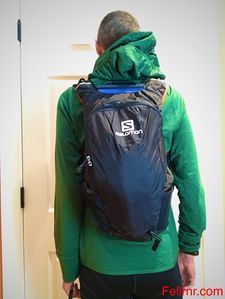
4.7 Salomon Skin Pro 15
This pack has a whistle. There the good new ends, with an uncomfortable pack that seems poorly thought out and it's hard to believe anyone tested it before release. There's lots of capacity, but no control of the load, relatively few pockets, and a total lack of comfort. The shoulder straps dug in enough to make that I can still feel them as I type this. If you want to run a long way, this pack will make it seem like you've gone further, turning the first mile into five.
- 14.5ox in weight (11.8oz claimed), with a claimed 15L capacity. In practice, the main compartment is huge, swallowing all my gear. The problem is that there's no way of cinching things down if the pack isn't full.
- The pack is made of moderately harsh and abrasive material.
- There's a 1.5L hydration bladder included and the sleeve held my bladder, but only just. The bladder sleeve is accessed directly, rather than via the main compartment, a nice touch.
- There's a padded, reflective pad at the back of the pack, which should help keep the bladder from getting the warmth of your body.
- There's no a stretch pocket over the back of the pack, nor is there bungee cord at the back, just some bungee on the base.
- There are huge mesh hip "pockets", but they don't seemed designed to hold things in place.
- The main compartment opens wide, and is so big I was left looking around for the rest of my gear when I'd actually put everything in.
- The shoulder straps each have an open pocket for bottles, and there's a stretchy pocket just below.
- An iPhone/iPhone plus will fit in the stretch pockets on the shoulder straps.
- The sternum straps clip into a few locations, but don't slide. The clips are infuriating and hard to use. I never got the hang of them, and it was always a battle to get them undone. I'm Guessing there's some knack to undoing them, but why didn't they use standard clips that just work?
- The sternum straps are stretchy, where most packs have inelastic straps, which I thought would be a good idea, but the elastic is too soft, resulting in a lack of control.
- They hydration hose loops down and back up, as you can see in the pictures. This seems like a much better approach.
- The pack is unstable, and reminds me of running with an American "book bag". It's like running with an angry cat on your back, swinging from side to side and bouncing up and down. The shoulder straps accentuate the problem, digging in and hurting the shoulders.
- There's a small gray whistle, which I wish it was a brighter color as it took me a while to track it down. However, a whistle might save your life, so I can't complain too much. Not about the whistle anyway.
- There are no side straps to pull the pack in closer, or length adjustment on the shoulder straps, and the fit was what I would best describe as "crappy."
- There's only one size, but I don't think size was the issue per se. It wasn't too big or too small, it just didn't work properly.
4.8 Nathan Synergy Pack
I got this pack as a prize at an ultra that Nathan sponsored, and never thought I'd use it due to its larger size. But as I started doing longer self-supported runs, I found that I needed the capacity. The Synergy works, but I wanted to see if there are better options, so this pack is my baseline standard I'll use for comparison.
- The main zippered compartment is 12L, which holds enough gear for a day long self-supported run.
- The materials seem durable, but rough.
- The compartment has a sleeve for a 3L hydration bladder.
- There is a zipped internal pocket that will hold ~3 GUs.
- There is a stretchy back pocket that's large enough for a thermal top, plus a bungee cord for attaching extra gear.
- Side mesh pockets will hold bottles.
- The main front straps have one zippered pocket and two open mesh pockets.
- The pack has two inelastic adjustable ties from the front straps to the body, which allow the pack to be secured so that bounce is limited. The straps tend to slap around when running, which is annoying.
- The two main straps are linked by a single sternum tie that uses a standard clip to join that's easy to work. The tie can move up and down, which moves the stress on the shoulder straps. The sternum tie has a clip for the hydration hose, but no whistle.
- There's no hip pockets.
- The pack bounces more than I'd like, and doesn't have enough elasticity to hug as well as I would hope. The bounce can be controlled by tightening the pack down, but the side adjustment is not easy to access when wearing the pack.
5 Hydration Bladders
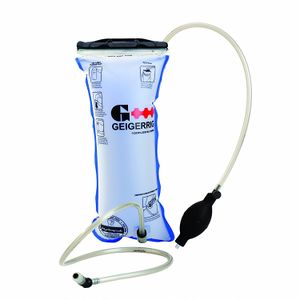
I've tried a variety of hydration bladders over the years, and I've recently discovered the Geigerrig pressurized hydration bladder, which is rapidly become my favorite. I've been greatly surprised by how much better I hydrate with a pressurized bladder. While it doesn't seem like that much effort to suck the fluid from an unpressurized system, the additional effort results in less fluid delivery in a given time (you drink more slowly.) Because you can't breathe and drink at the same time, this slow delivery while running makes hydration quite a lot harder. The other advantage of a pressurized system is that the bladder stays a fairly constant size, something I prefer as it keeps the hydration pack a little more stable.
5.1 Geigerrig Pressurized Hydration Engine
The Geigerrig system appears to be patented, and includes 2 separate chambers, one for your drink, and the other for the pressurized air. This means that assuming you squeeze all the air out of the fluid chamber, you never get a frothy mixture. This system also completely separates the drink and air tubes, so there's no problem with stocking up on a carbohydrate rich drink, as it won't clog up the pressurization components. This approach is not without its caveats, and in fact, there's actually quite a long list of minor problems…
- The most obvious issue is the price, as the Geigerrig retails for around $50 in the US. Error: Could not parse data from Amazon!
- Strangely, the capacity is a little smaller than advertised. I found that the 2-liter held about 1.8 liters and the 3-liter held about 2.8 liters.
- Because the Geigerrig doesn't have any interior baffles, the drink sloshes around quite a bit. You effectively have two bladders placed back to back, so the fluid sloshes against the pressurized air. This never caused me a problem, but it was a little noisy. It's actually a little bit more slosh than you would get from an unpressurized and unbaffled bladder.
- This is a pressurized system that relies on manual inflation, so you need to have the inflation bulb accessible to add more air during the run. This can be an issue depending how fully loaded your pack is and how it's designed. With the Hardrocker, I could easily and conveniently locate it in one of the shoulder pockets, but that takes up valuable real estate. When I'm carrying more gear, I tend to place it in the outer mesh pockets at the very back, and I can just about reach over my shoulder to add more air on the run.
- Some runners have found the on/off valve for the drinking tube to be a little awkward, but I haven't had any issue. Just grab the end and do a "lefty-loosey righty-tighty" twist.
- My first Geigerrig bladder started leaking badly on my second run with it. Luckily, the leak was in the pressurization system, so I could still use it as a normal, unpressurized bladder. I've not heard any reports of this being a widespread problem, and they offer a lifetime warranty, so I'm working on the basis that I was just extremely unlucky.
- The final problem is that you have a hose connection point on the front and the back of the bladder. Many hydration packs placed the bladder close to your back, so these hose connection points can easily rub. I found I needed to arrange the bladder with the pressurization connector facing away from my back, and the drinking connector facing towards the small of my back. I'd already put a small piece of closed cell foam over my Hardrocker pack (see above), so this lower connector didn't rub.
The key takeaway from this long list of minor problems is that they are all fairly minor. Having used a pressurized hydration bladder, it would be really hard to go back to an unpressurized system. The reduction in drinking effort makes it far more likely that I will stay appropriately hydrated, and I wish I'd had access to this system long ago.
5.2 Watertite Pressurized Hydration Bladder
Having fallen in love with the Geigerrig system above, I was curious if I could get all the advantages for half the price. (Error: Could not parse data from Amazon!.) Since the good news is that this system is indeed a pressurized hydration bladder, and it is well under half the price of the Geigerrig system. Unfortunately, this bladder should only be used with water, not sports drink. For me this was a deal-breaker, as I rarely if ever carry just plain water. The reason for the "water only" mandate is that the pressurization bulb is on the same hose that you drink from, so any fluid is going to get into the pressurization system and clog it up. A second reason for "water only" is that the Watertite bladder doesn't have a separate department for the pressurized air, and a sloshing effect will cause the drink and air to mix up and make a froth. This isn't too much of a problem with plain water, but a sports drink will result in quite a bit of frothiness, and the drinking that frothy mixture can cause digestive discomfort. I'm also a little concerned that the pressurization might cause a leak, and with a single compartment system you to lose all of your drink, whereas this a reasonable chance that a similar leak in the Geigerrig system would leave you with a viable if unpressurized bladder.
5.3 Non-pressurized bladders
I've not found one non-pressurized bladder significantly better than another. I've got on well with most of the name brands, including Camelbak, Platypus, Nathan, and Ultimate Direction. Before the Geirerrig, I'd settled on using the Error: Could not parse data from Amazon!) as I like it being slightly wider at the top than the bottom to move the fully loaded weight slightly higher up, and I find the plastic handle around the opening makes it easier to fill up. The bite valve works okay and the on-off switch is pretty good. However, it's all slight advantages over similar bladders, and using the bladder that comes with your pack helps ensure you have a good fit.
6 Storing Bladders
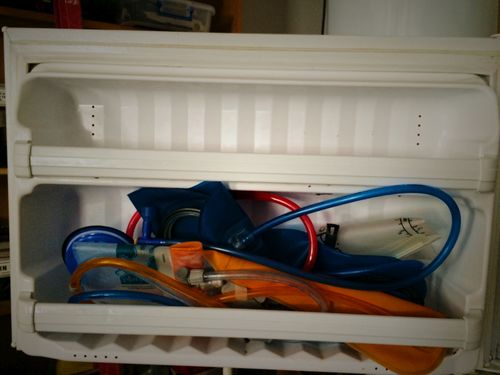
It's easy to get mold in a hydration bladder, and once that happens the best option is often to replace it. Rinsing with dilute bleach works for some people, but it often leaves an aftertaste. Rinsing and drying the bladder, then putting it in the freezer will prevent mold growing. If you rinse with rubbing alcohol, the bladder should dry more quickly. Use Ethyl Alcohol, not the toxic Isopropyl and remember the fumes are flammable.
