Best Hydration Systems
Correct hydration is of vital importance, and sometimes it is necessary to carry your drinks while running. Remember to drink based on your thirst, as over hydration is dangerous and can be fatal, while dehydration is far less of an issue than most people believe. Carrying fluids is always inconvenient, so choosing a hydration system is a matter of finding the least bad approach. There are several options open to you:
- Handheld bottle. Because the bottle is in your hand, you don't have problems with it jostling, rubbing, or banging against you. However the bottle occupies one (or both) of your hands, and can tire your arms. In some situations it can also change your biomechanics and running form.
- Waist pack. Putting your fluids around your waist frees up your hands and moves the weight onto your body. You can carry more fluid in this position than in a handheld bottle. Unfortunately, waist packs either put pressure on to your abdomen, which causes digestive problems, or it puts pressure on to your hips, causing the problems in the muscles of your hips and legs. Waist packs are particularly problematic for the ITB, as they put pressure on the activating muscle (TFL).
- Back pack. Using a back pack allows for the greatest quantity of fluid and keeps the weight on your shoulders and back which are stronger than your arms or abdomen. The downside to a backpack is that they tend to bounce and chafe while running.
- Cheating. The ideal option if you can manage it is to cache or buy drinks along your running route so you don't need to carry it.
Contents
1 Handheld Bottles

The most common approach to handheld running bottles is a simple strap around a bottle designed for cycling or other purposes. The classic example is the Nathan Quickdraw, which includes a pocket in the strap for a phone, gels, etc. While these bottles work they put a lot of twisting stress on your forearms and are a poor solution to the problem. The best bottles are the ones that allow your hand to go through the middle, as these are far more relaxing to hold. These oval running bottles are common in Europe, but seem to be hard to find in the US. However, they are starting to become available as the precision training and Hydrogrip.
1.1 Salomon Hydration Gloves
Salomon has a novel approach using a small hydration bladder that fits in a partial glove. They call this the "Salomon Sense Hydro S-Lab Handheld Hydration Set". This is a novel solution that at least partly works. It is reasonably relaxing to hold, but it only holds 8 fluid ounces/200 mL and is rather pricy for what it is.
- Salomon Sense Hydro S-Lab Handheld Hydration Set
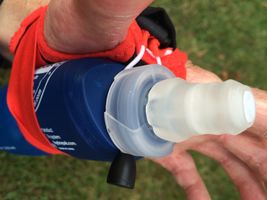
The small hydration bladder fits into the palm of the hand.
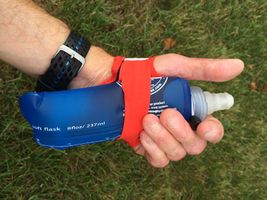
Your hand naturally cradles and controls the bladder in a reasonably comfortable way.
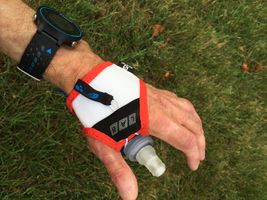
Here you can see the partial glove that holds the bladder in place.
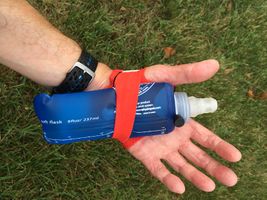
The bladder extends below the hand, even though it's only holding a relatively small amount of fluid.


2 Hydration Waist Packs
I have never found a waist pack that I get on with, and find they always cause either abdominal/digestive problems, or issues with the hip muscles. However, I know many runners get on well with the fuel belt system, typically for the marathon distance training runs. These small bottles distribute the weight better than systems that use one or two standard sized water bottles.
3 Hydration Backpacks
When we need more fluid than I can carry in a single handheld bottle, I swap to a hydration backpack. None of the backpacks I have tried avoid the problem of bouncing and chasing completely, but there are two that stand out as better than the others that I have tried, and two more that are worthy of consideration. (See below for more details.)
- Best Value. The Nathan HPL 020 Vest has been around for quite a while, and thankfully Nathan has not messed with a winning design. This 14oz pack holds 2 L along with various pockets for bits and pieces. Its adjustments hold the pack in place better than others I've tried, and it has minimal jostling. The HPL 020 is also a cheaper pack with an MSRP of $100 and can often be found for $80 or less.
- Minimalist. The UltrAspire Alpha Vest is a far more minimalist hydration pack, weighing less than Nathan, but achieving good levels of control. The Alpha is lightweight (12oz), which makes it a little smaller than many packs, and it does not have quite so much storage space which prevents you from loading yourself down. With an MSRP of $115, the Alpha is reasonable value for money.
- The Heavyweight. The Salomon Skin Pro 14+3 a larger pack, which is a mixed blessing. There are times when it's useful to be able to carry more gear, but the size of this pack does tend to encourage overloading. The MSRP is $160, so it's a little more expensive than the Nathan or the Alpha. If you need a small, lightweight (15oz) day pack in this is well worth considering.
- The maximalist. The Nathan Vapor Cloud is a heavier pack at 19oz, even though it only holds 11 Liters of gear, quite a bit less than the lighter Salomon. With an MSRP of $200 it's rather pricey for a hydration pack, but it does have some nice features. If you're not worried too much about weight or cost, then it's worth thinking about.
3.1 Nathan HPL 020 Vest
The Nathan HPL 020 Vest is a little older in its design, and is something of a classic. The 020 is also one of the cheaper packs on the market, making it good value for money.
- The design and features are rather minimalist and quite simple, which makes it much less likely you'll end up faxing around with confusing straps or forgotten pockets.
- There is a single main pocket to hold the bladder and a little bit of extra gear, with a small zippered pocket behind that for gloves, socks, etc.
- The right shoulder strap has an open topped pocket with a bungee fastener, and the left shoulder strap has a separate pocket with a tiny pouch in front of that.
- The shoulder straps are pulled together with a single clip. Earlier versions of the pack had a Velcro closure which I thought worked much better.
- The pack volume is just less than 5 liters, so you can carry about 3 liters of gear with the 2 liter bladder, and it weighs 14 oz with an empty bladder.
- Like virtually all hydration packs that are some bungee cords to tie extra clothes to the pack, and again the Nathan is a little more minimalist than most, making it a little trickier to tie stuff on.
- This pack only comes in a single size.
 Back view of the Nathan HPL 020 Vest |
 Front view of the Nathan HPL 020 Vest |
3.2 UltrAspire Alpha Vest
The UltrAspire Alpha Vest is a far more minimalist hydration pack, weighing less than Nathan, but achieving good levels of control.
- There is an open topped pouch forming the main body of the pack that holds the bladder, with a small Velcro tab to hold the top of the bladder in place.
- There are some useful bungee straps on the back of the pack to hold extra gear, and in the bungee cord clips onto the top of the pack to help hold things together, something which I found a little fiddly.
- At the base of the main pack there is a small pocket that is held closed by magnets and accessible from either side. This is a great piece of design that allows you to access gear stored in the main area without taking the pack off.
- The chest straps have a good sized mesh pocket on either side with a bungee closure, and each pocket would holds about 6 gels or similar. At the top of the right strap is a small pocket with a magnetic fastener, but this is rather small and would not fit a single gel, though you could probably put the keys. The left side has a similar sized mesh pocket with a zipper.
- I found the connectors for the chest straps a little fiddly, but they work once you get used to them.
- I do not like the mouthpiece of the bladder that comes with the Alpha, but it's easy to use an alternative.
- This pack comes in two sizes, and at 140 pounds the small size worked well for me.
 Back view of the UltrAspire Alpha Vest |
 Front view of the UltrAspire Alpha Vest. |
3.3 Salomon Skin Pro 14+3
The Salomon Skin Pro 14+3 is larger and more complex than most packs, and is the opposite of the Alpha. In some ways you can think of this pack as a very small, lightweight day pack, rather than as a typical hydration pack. The pack also tends to be a little more complex than I would like, with a wide array of pockets straps and fasteners. However, there are situations where you do need a pack that will carry more gear, like Hard Rock 100 where there are several hours between aid station cut off times. I don't think this is an ideal pack for running with, but it doesn't make a great ultralight day pack for hiking.
- The main body of the pack as a number of features:
- The bladder sits in its own sleeve that can be accessed independently from the other pockets.
- The main pocket is large enough for a thick fleece and is accessed by a zipper that goes over the top and down both sides, using two zips for flexibility.
- Behind the main pocket is a full-length thinner pocket that is accessed by a full-length zipper down one side.
- Either side of the main pack there are open holders that would accept a water bottle.
- The back of the pack is attached to straps going down the shoulder straps that allow the contents to be compressed in place, making it a little easier to carry the pack when it is partly loaded.
- The pack has some attachments for holding hiking poles though this is a rather more complex than I would like.
- Each shoulder strap has a reasonably large pocket that would contain a small bottle and is fastened with a bungee. The left pocket has a small mesh pocket attached that holds a gel.
- The closure for the shoulder straps uses a clip-on fastener with quite a bit of placement flexibility.
- The package includes an emergency whistle, which is a great idea.
- As the name suggests, this pack holds 17 Liters of gear and weighs a remarkably light 15oz.
 Back view of the Salomon Skin Pro 14+3. |
 Front view of the Salomon Skin Pro 14+3. |
3.4 Nathan Vapor Cloud
The Nathan Vapor Cloud is nice pack, and the materials that are used are nicer than the other packs I have recommended here. However these materials have both a financial and a weight cost.
- The main body of the pack is accessed via an open elasticated gap at the top. The hydration bladder sits in its own sleeve next to your back, and is held in place by a simple Velcro tab.
- There are also two full length zippered pockets on the back one with a horizontal zipper and the other with a vertical zipper.
- There is a third full-length pocket that is on the inside of the back of the pack, which Nathan suggest is for an ice pack, which is a nice idea but would be rather uncomfortable.
- There are some internal straps intended to compress the hydration bladder and prevent it sloshing around when it's partially empty.
- There is a good length of bungee cord across the back for time on extra gear.
- Each of the hip belts contains a zippered pocket that would hold a few gels.
- Each shoulder strap has an open pocket with a bungee closer that would hold several gels, but not a waterfall.
- The right shoulder strap is a tiny pocket with a Velcro closure. Nathan suggests this pocket is for pills.
- The hydration tube has a magnetic clip to attach it to the shoulder straps, which is a nice idea.
- The shoulder straps are clipped together with the usual buckles.
- The package includes an emergency whistle, which is a great idea.
 Back view of the Nathan Vapor Cloud. |
 Front view of the Nathan Vapor Cloud. |
4 Storing Bladders
It's easy to get mold in a hydration bladder, and once that happens the best option is often to replace it. Rinsing with dilute bleach works for some people, but it often leaves an aftertaste. Rinsing and drying the bladder, then putting it in the freezer will prevent mold growing. If you rinse with rubbing alcohol, the bladder should dry more quickly. Use Ethyl Alcohol, not the toxic Isopropyl and remember the fumes are flammable.
